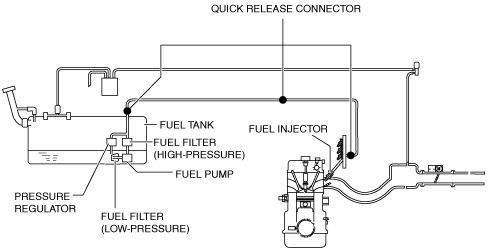
QUICK RELEASE CONNECTOR REMOVAL/INSTALLATION [MZR 1.6]
id0114f4801700
-
Warning
-
• Highly pressurized fuel may spray out if the fuel line is cut. Due to the following dangers occurring with a fuel spray, always complete the “Fuel Line Safety Procedure” to prevent the fuel from spraying.
-
― Fuel may cause irritation if it comes in contact with skin and eyes.
― If fuel ignites and causes a fire, it may lead to serious injury or death, and damage to property and facilities.
• A person charged with static electricity could cause a fire or explosion, resulting in death or serious injury. Before draining fuel, make sure to discharge static electricity by touching the vehicle body.
-
Caution
-
• Disconnecting/connecting the quick release connector without cleaning it may cause damage to the fuel pipe and quick release connector. Always clean the quick release connector joint area before disconnecting/connecting using a cloth or soft brush, and make sure that it is free of foreign material.
Removal
1. Complete the “BEFORE SERVICE PRECAUTION”. (See BEFORE SERVICE PRECAUTION [MZR 1.6].)
2. Move the retainer upward using a small flathead screwdriver or a similar tool.
3. Pull out the fuel hose straight from the fuel pipe and disconnect it.
4. Cover the disconnected quick release connector and fuel pipe with vinyl sheeting or a similar material to prevent it from getting scratched or dirty.
Installation
-
Note
-
• If the quick release connector O-ring is damaged or has slipped, replace the fuel hose.
1. Inspect the fuel hose and fuel pipe sealing surface for damage and deformation.
-
• If there is any malfunction, replace it with a new one.
2. Apply a small amount of clean engine oil to the sealing surface of the fuel pipe.
3. Install the quick release connector.
-
• Insert the fuel pipe straight to the end of the quick release connector.
• Push down the retainer using a finger.
-
― If the retainer cannot be pushed down, push the fuel pipe further to the quick release connector.
4. Lightly pull and push the quick release connector a few times by hand, and then verify that it is connected securely.
5. Complete the “AFTER SERVICE PRECAUTION”. (See AFTER SERVICE PRECAUTION [MZR 1.6].)
