AUTOMATIC TRANSAXLE FLUID (ATF) ADJUSTMENT [FW6A-EL]
id0517h1119300
-
Caution
-
• Only adjust the ATF level when the ATF temperature is 45—55 °C {113—131 °F}. If the ATF level is incorrect, it could damage the transaxle.
• Do not add ATF over the specification. Otherwise, the transaxle performance could be reduced and ATF could leak.
1. Remove the front under cover No.2. (See FRONT UNDER COVER No.2 REMOVAL/INSTALLATION.)
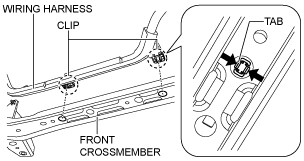
2. Disconnect the wiring harness from the front crossmember. (Vehicle with i-ELOOP)
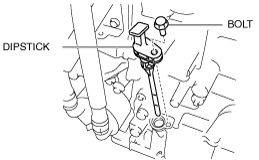
3. Remove the dipstick securing bolt.
4. Remove the dipstick.
5. Adjust the ATF level.
- (1) Connect the M-MDS to the DLC-2 and display the PID TFT.
- (2) Warm up the engine until the ATF temperature is 50 °C {122 °F}.
- (3) Remove the dipstick and wipe the ATF off using a rag while leaving the engine idling.
-
-
Warning
-
• Keep hands and tools away from the cooling fan even if the cooling fan is not operating to prevent injury, or damage to the cooling fan.
• Do not touch parts which have become heated. Otherwise, it could cause severe burns or serious injury.
- (4) Insert the dipstick and pull it out again.
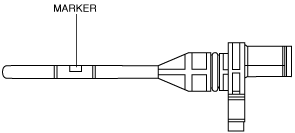
- (5) Verify that ATF is adhering to the central marker area on the dipstick.
-
-
• If ATF is not adhering to the central marker area on the dipstick, adjust the ATF level to the central marker area.
-
Note
-
• The ATF color is blue.
• Only use ATF FZ for the FW6A-EL.
6. Insert the dipstick and install the securing bolt.
-
Tightening torque
-
8—11 N·m {82—112 kgf·cm, 71—97 in·lbf}
7. Connect the wiring harness to the front crossmember. (Vehicle with i-ELOOP)
8. Install the front under cover No.2. (See FRONT UNDER COVER No.2 REMOVAL/INSTALLATION.)