 |
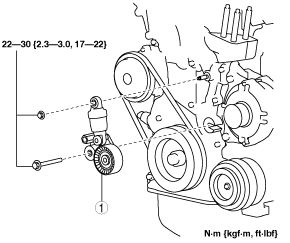
DRIVE BELT AUTO TENSIONER REMOVAL/INSTALLATION [SKYACTIV-G 1.5, SKYACTIV-G 2.0, SKYACTIV-G 2.5]
id0110h6362500
1. Remove the plug hole plate. (See PLUG HOLE PLATE REMOVAL/INSTALLATION [SKYACTIV-G 1.5, SKYACTIV-G 2.0, SKYACTIV-G 2.5].)
2. Remove the generator drive belt. (See DRIVE BELT REMOVAL/INSTALLATION [SKYACTIV-G 1.5, SKYACTIV-G 2.0, SKYACTIV-G 2.5].)
3. Remove in the order indicated in the table.
4. Install in the reverse order of removal.
am6zzw00010031
|
|
1
|
Drive belt auto tensioner
|
Drive Belt Auto Tensioner Installation Note
1. Install the drive belt auto tensioner to the engine.
2. Insert the wrench onto the cast hexagon on the drive belt auto tensioner, move the drive belt auto tensioner up and down at full-stroke three times to bleed the air.
SKYACTIV-G 1.5
am3zzw00014963
|
SKYACTIV-G 2.0, SKYACTIV-G 2.5
am6zzw00010032
|