 |
am3zzw00020483
CALIPER (FRONT) DISASSEMBLY/ASSEMBLY
id041100801000
1. Disassemble in the order indicated in the table.
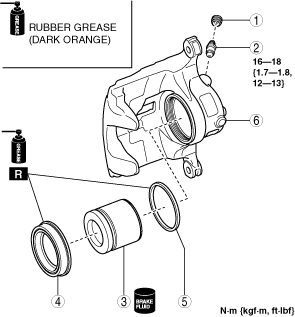
Front caliper type A
am3zzw00020483
|
|
1
|
Bleeder cap
|
|
2
|
Bleeder screw
|
|
3
|
Piston
(See Piston Disassembly Note.)
|
|
4
|
Dust seal
|
|
5
|
Piston seal
|
|
6
|
Caliper body
|
Front caliper type B
am3zzw00015870
|
|
1
|
Bleeder cap
|
|
2
|
Bleeder screw
|
|
3
|
Piston
(See Piston Disassembly Note.)
|
|
4
|
Dust seal
|
|
5
|
Piston seal
|
|
6
|
Caliper body
|
2. Assemble in the reverse order of removal.
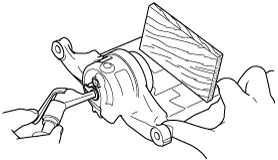
Piston Disassembly Note
1. Insert a piece of wood in the caliper as shown in the figure and blow compressed air through the hole to remove the piston from the caliper body.
am3uuw00012120
|