 |
am3uuw00013232
OUTER MIRROR GARNISH REMOVAL/INSTALLATION
id091200003000
VIN:JM1
Removal
1. Disconnect the negative battery cable. (See NEGATIVE BATTERY CABLE DISCONNECTION/CONNECTION [SKYACTIV-D 2.2]) (See NEGATIVE BATTERY CABLE DISCONNECTION/CONNECTION [SKYACTIV-G 1.5, SKYACTIV-G 2.0, SKYACTIV-G 2.5]) (See NEGATIVE BATTERY CABLE DISCONNECTION/CONNECTION [MZR 1.6])(See NEGATIVE BATTERY CABLE DISCONNECTION/CONNECTION [SKYACTIV-D 1.5].)
2. Remove the outer mirror glass. (See OUTER MIRROR GLASS REMOVAL.)
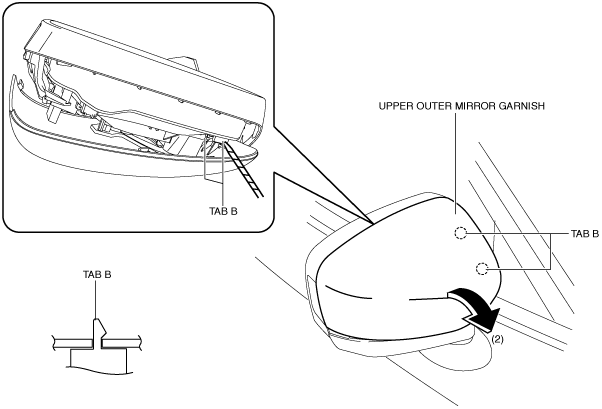
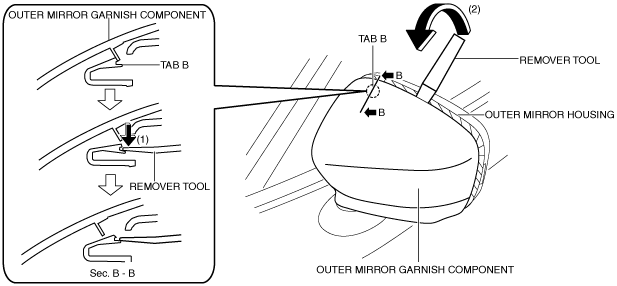
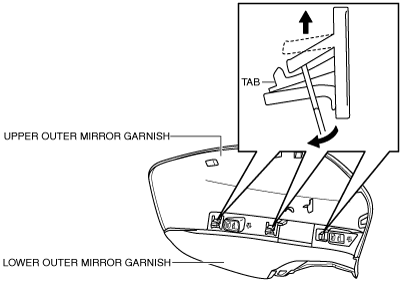
3. Insert a tape-wrapped flathead screwdriver into the upper outer mirror garnish and remove tab A in the direction of arrow (1).
am3uuw00013232
|
4. Insert a tape-wrapped flathead screwdriver into the upper outer mirror garnish and remove tab B in the direction of arrow (2).
am3uuw00013233
|
Installation
1. Install the outer mirror glass. (See OUTER MIRROR GLASS INSTALLATION.)
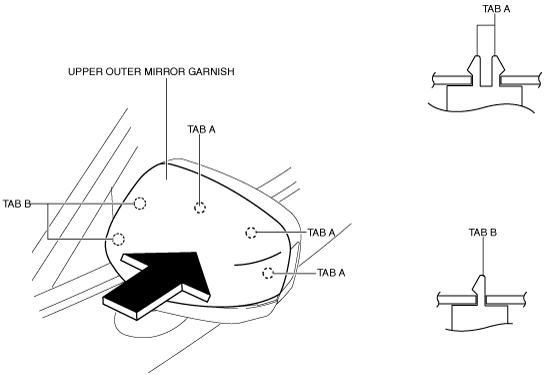
2. Press the upper outer mirror garnish in the direction of the arrow shown in the figure and install tabs A and B.
am3zzw00017318
|
3. Connect the negative battery cable. (See NEGATIVE BATTERY CABLE DISCONNECTION/CONNECTION [SKYACTIV-D 2.2]) (See NEGATIVE BATTERY CABLE DISCONNECTION/CONNECTION [SKYACTIV-G 1.5, SKYACTIV-G 2.0, SKYACTIV-G 2.5]) (See NEGATIVE BATTERY CABLE DISCONNECTION/CONNECTION [MZR 1.6])(See NEGATIVE BATTERY CABLE DISCONNECTION/CONNECTION [SKYACTIV-D 1.5].)
VIN:3MZ
Removal
1. Disconnect the negative battery cable. (See NEGATIVE BATTERY CABLE DISCONNECTION/CONNECTION [SKYACTIV-G 1.5, SKYACTIV-G 2.0, SKYACTIV-G 2.5]) (See NEGATIVE BATTERY CABLE DISCONNECTION/CONNECTION [MZR 1.6]) (See NEGATIVE BATTERY CABLE DISCONNECTION/CONNECTION [SKYACTIV-D 1.5].)
2. Remove the outer mirror glass. (See OUTER MIRROR GLASS REMOVAL.) (See OUTER MIRROR GLASS INSTALLATION.)
3. Affix protective tape to the shaded area shown in the figure of the outer mirror housing.
am3uuw00013156
|
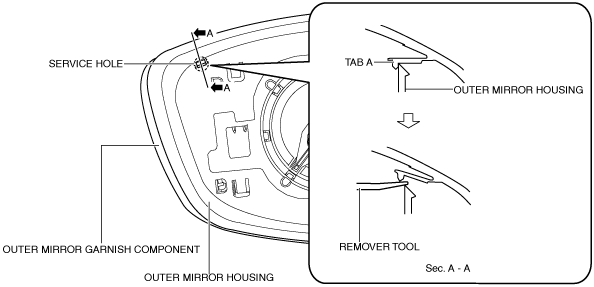
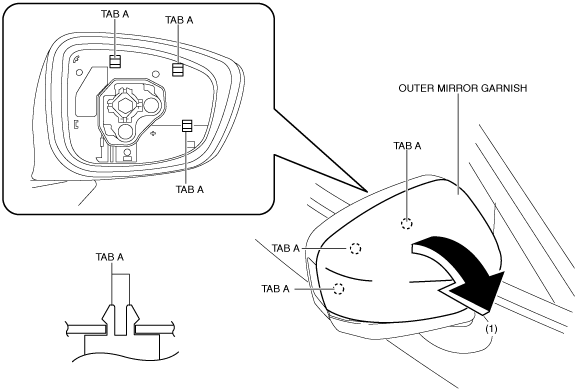
4. Insert the remover tool into the service hole shown in the figure so that tab A of the outer mirror garnish component is pressed up.
am3uuw00013158
|
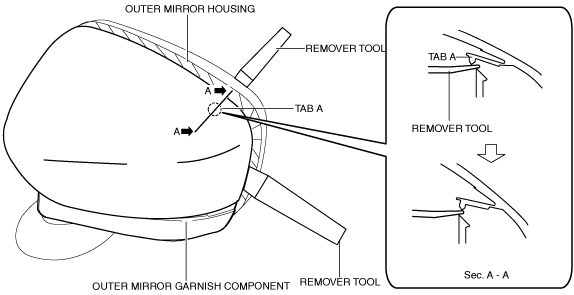
5. With tab A of the outer mirror garnish component pressed up, insert the remover tool into the position shown in the figure and pull tab A of the outer mirror garnish component out of the outer mirror housing.
am3uuw00013159
|
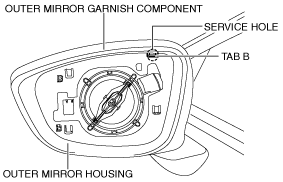
6. Insert the remover tool in the service hole shown in the figure.
am3uuw00013160
|
7. While pressing down tab B of the outer mirror housing in the direction of arrow (1) shown in the figure, insert the remover tool into the position shown in the figure, move it in the direction of arrow (2), and detach tab B of the outer mirror housing from the outer mirror garnish component.
am3uuw00013161
|
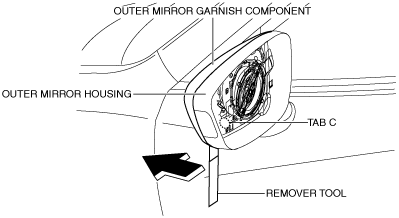
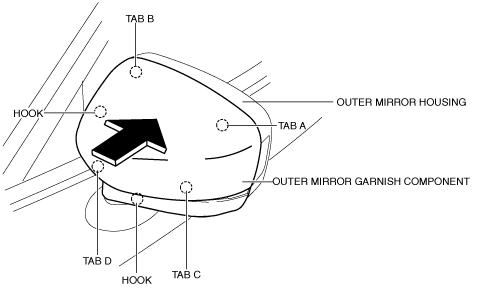
8. Insert the remover tool into the position shown in the figure, move it in the direction of the arrow, and detach tab C of the outer mirror garnish component from the outer mirror housing.
am3zzw00016455
|
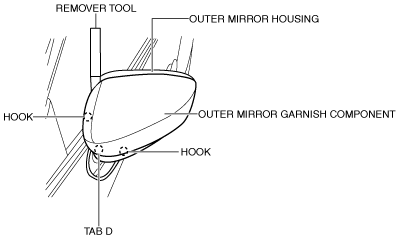
9. Insert the remover tool into the position shown in the figure, secure a gap between the outer mirror garnish component and the outer mirror housing, and detach tab D and the hooks of the outer mirror garnish component from the outer mirror housing.
am3uuw00013163
|
10. Remove the outer mirror garnish component.
11. Detach the tab of the upper outer mirror garnish from the lower outer mirror garnish to remove the upper outer mirror garnish.
am3uuw00013164
|
Installation
1. Install the upper outer mirror garnish to the lower outer mirror garnish.
2. Press the outer mirror garnish component in the direction of the arrow shown in the figure and install it.
am3zzw00017319
|
3. Install the outer mirror glass. (See OUTER MIRROR GLASS INSTALLATION.)
4. Connect the negative battery cable. (See NEGATIVE BATTERY CABLE DISCONNECTION/CONNECTION [SKYACTIV-G 1.5, SKYACTIV-G 2.0, SKYACTIV-G 2.5]) (See NEGATIVE BATTERY CABLE DISCONNECTION/CONNECTION [MZR 1.6]) (See NEGATIVE BATTERY CABLE DISCONNECTION/CONNECTION [SKYACTIV-D 1.5].)