 |
am3zzw00013810
FRONT DOOR KEY CYLINDER SWITCH INSPECTION
id091400511000
LH
1. Perform the front door glass preparation. (See FRONT DOOR GLASS REMOVAL/INSTALLATION.)
2. Disconnect the negative battery cable. (See NEGATIVE BATTERY CABLE DISCONNECTION/CONNECTION [MZR 1.6].) (See NEGATIVE BATTERY CABLE DISCONNECTION/CONNECTION [SKYACTIV-G 1.5, SKYACTIV-G 2.0, SKYACTIV-G 2.5].) (See NEGATIVE BATTERY CABLE DISCONNECTION/CONNECTION [SKYACTIV-D 2.2].)(See NEGATIVE BATTERY CABLE DISCONNECTION/CONNECTION [SKYACTIV-D 1.5].)
3. Remove the following parts:
Front door key cylinder switch lock-side inspection
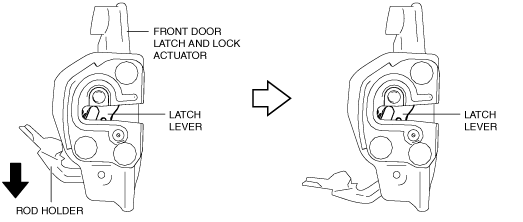
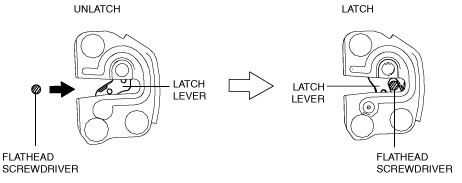
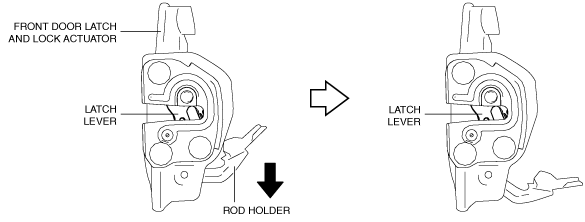
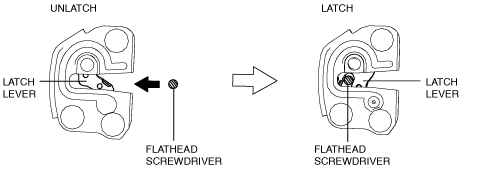
1. Press in the latch lever of the front door latch and lock actuator using a flathead screwdriver, and set it to the latched condition.
am3zzw00013810
|
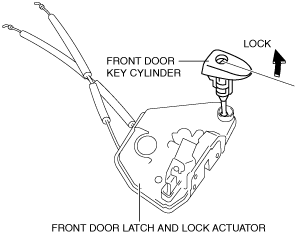
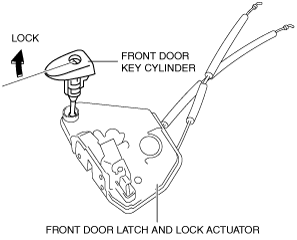
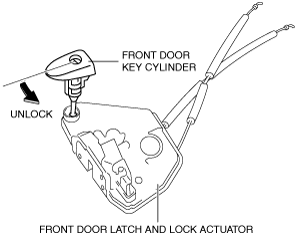
2. Rotate the front door key cylinder in the direction of the arrow until it stops to set the front door key cylinder switch to the locked condition.
am3uuw00010033
|
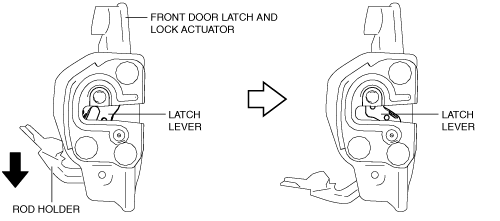
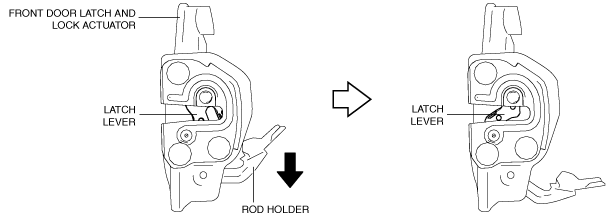
3. To verify that the switch is in the locked position, press down the rod holder in the direction of the arrow and verify that the latch lever does not move.
am3zzw00013811
|
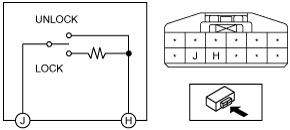
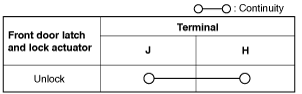
4. Inspect the resistance between front door latch and lock actuator terminals J and H.
am3zzw00013733
|
Front door key cylinder switch unlock-side inspection
1. Press in the latch lever of the front door latch and lock actuator using a flathead screwdriver, and set it to the latched condition.
am3zzw00013810
|
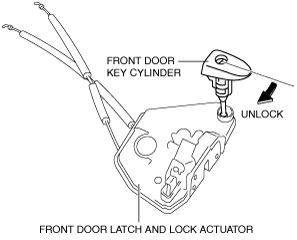
2. Rotate the front door key cylinder in the direction of the arrow until it stops to set the front door key cylinder switch to the unlocked condition.
am3uuw00011812
|
3. To verify that the switch is in the unlocked position, press down the rod holder in the direction of the arrow and verify that the latch lever moves.
am3zzw00013812
|
4. Verify that the continuity of the front door latch and lock actuator is as indicated in the table.
am3zzw00013734
|
am3zzw00013733
|
RH
1. Perform the front door glass preparation. (See FRONT DOOR GLASS REMOVAL/INSTALLATION.)
2. Disconnect the negative battery cable. (See NEGATIVE BATTERY CABLE DISCONNECTION/CONNECTION [SKYACTIV-G 1.5, SKYACTIV-G 2.0, SKYACTIV-G 2.5].) (See NEGATIVE BATTERY CABLE DISCONNECTION/CONNECTION [SKYACTIV-D 2.2].)(See NEGATIVE BATTERY CABLE DISCONNECTION/CONNECTION [SKYACTIV-D 1.5].)
3. Remove the following parts:
Front door key cylinder switch lock-side inspection
1. Press in the latch lever of the front door latch and lock actuator using a flathead screwdriver, and set it to the latched condition.
am3zzw00013813
|
2. Rotate the front door key cylinder in the direction of the arrow until it stops to set the front door key cylinder switch to the locked condition.
am3zzw00013814
|
3. To verify that the switch is in the locked position, press down the rod holder in the direction of the arrow and verify that the latch lever does not move.
am3zzw00013815
|
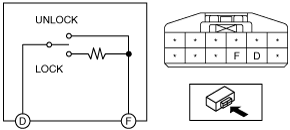
4. Inspect the resistance between front door latch and lock actuator terminals D and F.
am3zzw00013816
|
Front door key cylinder switch unlock-side inspection
1. Press in the latch lever of the front door latch and lock actuator using a flathead screwdriver, and set it to the latched condition.
am3zzw00013813
|
2. Rotate the front door key cylinder in the direction of the arrow until it stops to set the front door key cylinder switch to the unlocked condition.
am3zzw00013817
|
3. To verify that the switch is in the unlocked position, press down the rod holder in the direction of the arrow and verify that the latch lever moves.
am3zzw00013818
|
4. Verify that the continuity of the front door latch and lock actuator is as indicated in the table.
am3zzw00013819
|
am3zzw00013816
|