 |
ac5wzw00005019
OIL CONTROL VALVE (OCV) REMOVAL/INSTALLATION [SKYACTIV-D 2.2]
id0110s5801300
Operation After Replacing OCV
1. After replacing the OCV, perform the following procedure.
|
STEP |
ACTION |
PAGE/CONDITION |
|---|---|---|
|
1
|
Perform KOEO self-test procedure.
|
|
|
2
|
Switch the ignition off.
|
—
|
|
3
|
Verify that the check engine light does not illuminate.
|
—
|
|
4
|
Switch the ignition off.
|
—
|
OCV Removal/Installation
1. Disconnect the negative battery cable. (See NEGATIVE BATTERY CABLE DISCONNECTION/CONNECTION [SKYACTIV-D 2.2].)
2. Remove the engine cover. (See ENGINE COVER REMOVAL/INSTALLATION [SKYACTIV-D 2.2].)
3. Remove the battery. (See BATTERY REMOVAL/INSTALLATION [SKYACTIV-D 2.2].)
4. Remove the air inlet pipe and turbocharger air inlet hose as a single unit. (See INTAKE-AIR SYSTEM REMOVAL/INSTALLATION [SKYACTIV-D 2.2].)
5. Remove in the order indicated in the table.
6. Install in the reverse order of removal.
7. If the OCV is replaced, perform “Operation After Replacing OCV”. (See Operation After Replacing OCV.)
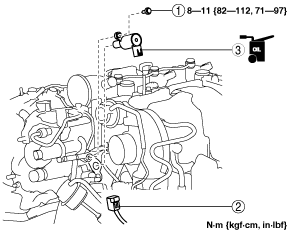
ac5wzw00005019
|
|
1
|
OCV installation bolt
|
|
2
|
OCV connector
|
|
3
|
OCV
(See OCV Removal/Installation.)
|
OCV connector disconnection note
1. Pull out the OCV from the cylinder head with the OCV connector connected.
2. Disconnect the OCV connector.
OCV installation note
OCV installation bolt installation note