WATER-COOLED CHARGE AIR COOLER COOLANT REPLACEMENT [SKYACTIV-D 1.5]
id0112q2702200
-
Warning
-
• If the engine cooling system cap or the water-cooled charge air cooler reserve tank cap is removed when the engine is hot, steam and boiling water may be injected, causing severe burns or severe injury. Perform the removal of the engine cooling system cap and water-cooled charge air cooler reserve tank cap when the engine is cool.
• Turn off the engine and wait until it is cool. Even then, be very careful when removing the cap. Wrap a thick cloth around it and slowly turn it counterclockwise to the first stop. Step back while the pressure escapes.
• When you are sure all the pressure is gone, press down on the cap using the cloth, turn it, and remove it.
-
Caution
-
• Use engine coolant at a concentration that meets the environmental conditions in which the vehicle is driven, otherwise engine damage could occur.
• The engine has aluminum parts and must be protected by an ethylene-glycol-based coolant to prevent corrosion and freezing.
• Do not use coolants containing Alcohol, Methanol, Borate or Silicate. These coolants could damage the cooling system.
• Use only soft (demineralized) water in the coolant mixture. Water that contains minerals will cut down on the coolant's effectiveness.
• Engine coolant damages paint. If engine coolant does get on a painted surface, rinse it off quickly.
-
Note
-
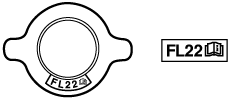
• If the “FL22” mark is shown on or near the water-cooled charge air cooler reserve tank cap, use FL22 type engine coolant.
• FL22 type engine coolant is shipped as a diluted solution. Use the solution as is when replacing coolant.
-
Water-cooled charge air cooler coolant capacity (approx. quantity)
-
1.8 L {1.9 US qt, 1.6 Imp qt}
1. Remove the engine cover. (See ENGINE COVER REMOVAL/INSTALLATION [SKYACTIV-D 1.5].)
2. Remove the front under cover No.2. (See FRONT UNDER COVER No.2 REMOVAL/INSTALLATION.)
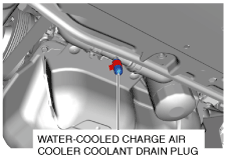
3. Remove the drain plug of the water-cooled charge air cooler coolant and drain the water-cooled charge air cooler coolant.
4. Remove the water-cooled charge air cooler reserve tank cap.
5. After completely draining the water-cooled charge air cooler coolant, install the drain plug of the water-cooled charge air cooler coolant.
6. Remove the two fresh-air duct bolts shown in the figure.
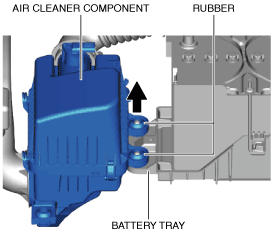
7. Remove the rubber at the two locations on the air cleaner component from the battery tray.
8. Set the fresh-air duct and the air cleaner component aside to the left side of the vehicle as a single unit.
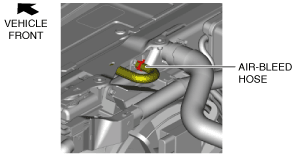
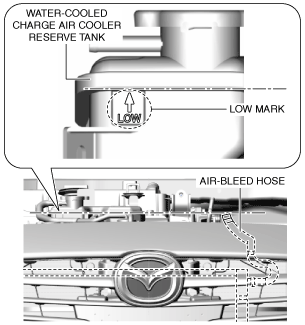
9. Disconnect the water-cooled charge air cooler coolant air-bleed hose from the engine radiator.
10. Wrap a cloth around the air-bleed hose.
11. Secure the air-bleed hose with its end positioned as the same height as the LOW mark on the water-cooled charge air cooler reserve tank.
12. Add water-cooled charge air cooler coolant from the filling port of the water-cooled charge air cooler reserve tank until the water-cooled charge air cooler coolant flows out of the air-bleed hose.
-
Note
-
• Air bleeding is completed if the water-cooled charge air cooler coolant flows out of the hose.
13. After the air bleeding is completed, connect the air-bleed hose to the engine radiator.
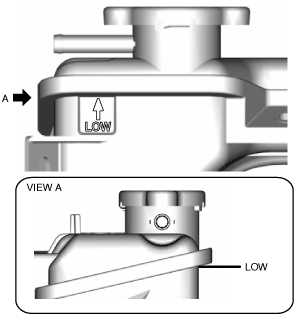
14. Verify that the water-cooled charge air cooler coolant level in the water-cooled air cooler reserve tank is above the LOW mark.
-
• Add water-cooled charge air cooler coolant if the coolant level is below the LOW mark. (See
15. Install the water-cooled charge air cooler reserve tank cap.
16. Inspect for water-cooled charge air cooler coolant leakage. (See WATER-COOLED CHARGE AIR COOLER COOLANT LEAKAGE INSPECTION [SKYACTIV-D 1.5].)
17. Install the rubber at the two locations on the air cleaner component to the battery tray.
18. Tighten the two fresh-air duct bolts shown in the figure.
-
Tightening torque
-
8—10 N·m {82—101 kgf·cm, 71—88 in·lbf}
19. Install the front under cover No.2. (See FRONT UNDER COVER No.2 REMOVAL/INSTALLATION.)
20. Install the engine cover. (See ENGINE COVER REMOVAL/INSTALLATION [SKYACTIV-D 1.5].)