 |
am6zzw00010263
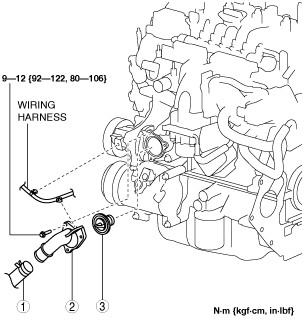
THERMOSTAT REMOVAL/INSTALLATION [SKYACTIV-D 2.2]
id0112s6801200
1. Disconnect the negative battery cable. (See NEGATIVE BATTERY CABLE DISCONNECTION/CONNECTION [SKYACTIV-D 2.2].)
2. Remove the engine cover. (See ENGINE COVER REMOVAL/INSTALLATION [SKYACTIV-D 2.2].)
3. Remove the front under cover No.2. (See FRONT UNDER COVER No.2 REMOVAL/INSTALLATION.)
4. Drain the engine coolant. (See ENGINE COOLANT REPLACEMENT [SKYACTIV-D 2.2].)
5. Disconnect generator terminal B and set the wiring harness aside. (See GENERATOR REMOVAL/INSTALLATION [SKYACTIV-D 2.2 (WITH i-ELOOP)].) (See GENERATOR REMOVAL/INSTALLATION [SKYACTIV-D 2.2 (WITHOUT i-ELOOP)].)
6. Remove in the order indicated in the table.
7. Install in the reverse order of removal.
8. Refill the engine coolant. (See ENGINE COOLANT REPLACEMENT [SKYACTIV-D 2.2].)
9. Inspect for the engine coolant leakage. (See ENGINE COOLANT LEAKAGE INSPECTION [SKYACTIV-D 2.2].)
am6zzw00010263
|
|
1
|
Lower radiator hose (Thermostat cover side)
|
|
2
|
Thermostat cover
|
|
3
|
Thermostat
(See Thermostat Installation Note.)
|
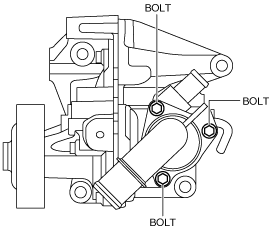
Thermostat Cover Removal Note
1. Slightly loosen the three thermostat bolts shown in the figure and collect the draining engine coolant into a container.
ac5wzw00004879
|
2. After the engine coolant stops draining, remove the thermostat cover.
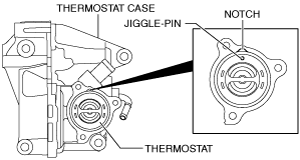
Thermostat Installation Note
1. Install the thermostat with the jiggle pin aligned with the notch of the thermostat case.
ac5wzw00004880
|
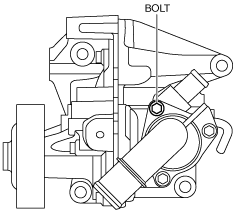
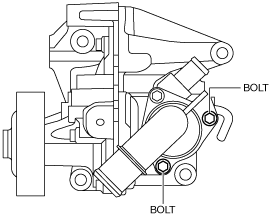
Thermostat Cover Installation Note
1. Install the thermostat cover using the following procedure:
ac5wzw00004881
|
ac5wzw00004882
|
ac5wzw00004881
|