 |
am3zzw00016374
VACUUM PUMP INSPECTION
id041100811000
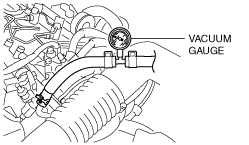
SKYACTIV-G 1.5, SKYACTIV-G 2.0, SKYACTIV-G 2.5
1. Pinch open the clamp using pliers and disconnect the vacuum hose from the vacuum pump. (See VACUUM HOSE REMOVAL/INSTALLATION.)
2. Install the vacuum gauge.
am3zzw00016374
|
3. Warm up the engine.
4. Switch the ignition off.
5. Depress the brake pedal several times and decrease the vacuum of the vacuum gauge to 0 kPa {0 mmHg, 0 inHg}.
6. Switch the ignition ON (engine on).
7. Perform the inspection for the degree of vacuum in the vacuum pump.
Degree of vacuum in vacuum pump standard (reference)
|
Measurement condition |
Specification |
|||
|---|---|---|---|---|
|
Engine rotation speed |
Brake pedal |
Measurement-start vacuum |
Measurement-stop vacuum |
|
|
While idling
(520—700 rpm (reference))
|
Depressed
|
60 kPa {450 mmHg, 18 inHg}
|
67 kPa {503 mmHg, 20 inHg}
|
Within 8 s
|
8. Perform the inspection for the degree of maximum attained vacuum in the vacuum pump.
Degree of maximum attained vacuum in vacuum pump standard (reference)
|
Measurement condition |
Specification |
|
|---|---|---|
|
Engine rotation speed |
Measurement time |
|
|
While idling
(520—700 rpm (reference))
|
No time designation
|
93.3 kPa {700 mmHg, 27.6 inHg} or more
|
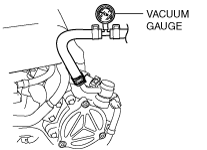
SKYACTIV-D 1.5, SKYACTIV-D 2.2
1. Remove the engine cover. (See ENGINE COVER REMOVAL/INSTALLATION [SKYACTIV-D 1.5].) (See ENGINE COVER REMOVAL/INSTALLATION [SKYACTIV-D 2.2])
2. Pinch open the clamp using pliers and disconnect the vacuum hose from the vacuum pump. (See VACUUM HOSE REMOVAL/INSTALLATION.)
3. Install the vacuum gauge.
am3zzw00016375
|
4. Warm up the engine.
5. Switch the ignition off.
6. Depress the brake pedal several times and decrease the vacuum of the vacuum gauge to 0 kPa {0 mmHg, 0 inHg}.
7. Switch the ignition ON (engine on).
8. Perform the inspection for the degree of vacuum in the vacuum pump.
Degree of vacuum in vacuum pump maximum (reference)
|
Measurement condition |
Maximum value |
|||
|---|---|---|---|---|
|
Engine rotation speed |
Brake pedal |
Measurement-start vacuum |
Measurement-stop vacuum |
|
|
While idling
(750 rpm (reference))
|
Depressed
|
0 kPa {0 mmHg, 0 inHg}
|
67 kPa {503 mmHg, 20 inHg}
|
15 s + Engine completely warmed up
|