BLOWER UNIT REMOVAL/INSTALLATION
id071100800500
L.H.D.
1. Disconnect the negative battery cable. (See NEGATIVE BATTERY CABLE DISCONNECTION/CONNECTION [MZR 1.6].)(See NEGATIVE BATTERY CABLE DISCONNECTION/CONNECTION [SKYACTIV-G 1.5, SKYACTIV-G 2.0, SKYACTIV-G 2.5].)(See NEGATIVE BATTERY CABLE DISCONNECTION/CONNECTION [SKYACTIV-D 1.5].)(See NEGATIVE BATTERY CABLE DISCONNECTION/CONNECTION [SKYACTIV-D 2.2].)
2. Remove the following parts:
- (1) Glove compartment (See GLOVE COMPARTMENT REMOVAL/INSTALLATION.)
-
- (2) Decoration panel (See DECORATION PANEL REMOVAL/INSTALLATION.)
-
- (3) Dashboard under cover (See DASHBOARD UNDER COVER REMOVAL/INSTALLATION.)
-
- (4) Side wall (passenger-side) (See SIDE WALL REMOVAL/INSTALLATION.)
-
- (5) Front heat duct (passenger-side) (See FRONT HEAT DUCT REMOVAL/INSTALLATION.)
-
- (6) Front scuff plate (passenger-side) (See FRONT SCUFF PLATE REMOVAL/INSTALLATION.)
-
- (7) Front side trim (passenger-side) (See FRONT SIDE TRIM REMOVAL/INSTALLATION.)
-
- (8) Lower panel (passenger-side) (See LOWER PANEL REMOVAL/INSTALLATION.)
-
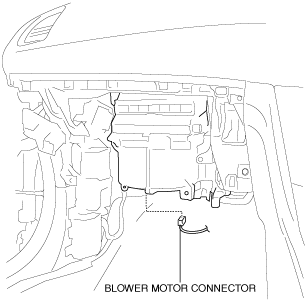
3. Disconnect the blower motor connector.
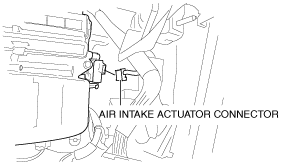
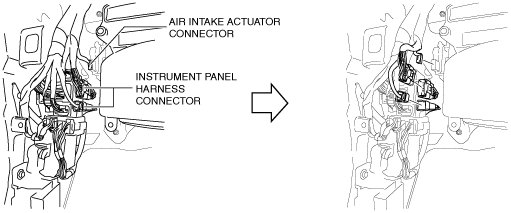
4. Disconnect the air intake actuator connector.
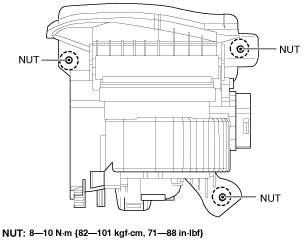
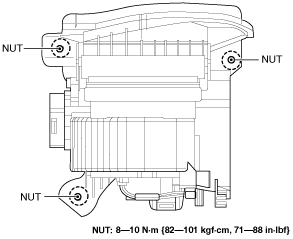
5. Remove the blower unit installation nuts.
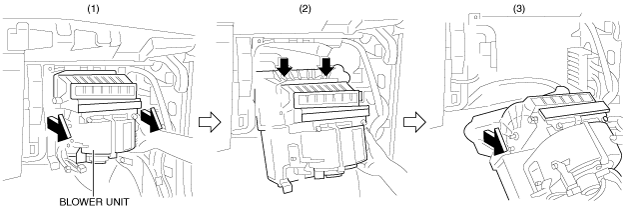
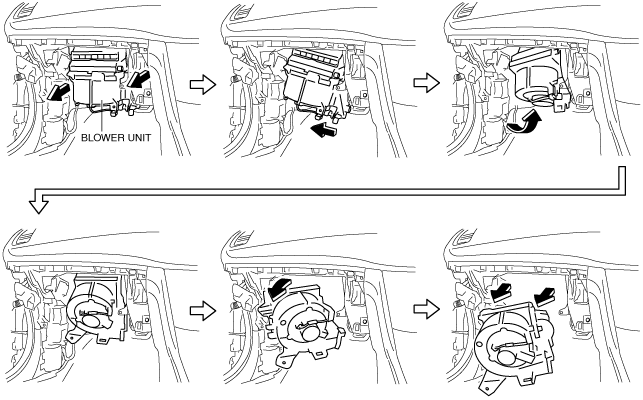
6. Remove the blower unit as shown in the figure.
-
Caution
-
• When removing the blower unit, move it little by little while verifying that there is no sticking in the surrounding parts or the wiring harness. If the blower unit is removed with excessive force, surrounding parts or the blower unit could be damaged.
7. Install in the reverse order of removal.
R.H.D.
1. Remove the following parts:
- (1) Glove compartment (See GLOVE COMPARTMENT REMOVAL/INSTALLATION.)
-
- (2) Decoration panel (See DECORATION PANEL REMOVAL/INSTALLATION.)
-
- (3) Dashboard under cover (See DASHBOARD UNDER COVER REMOVAL/INSTALLATION.)
-
- (4) Side wall (passenger-side) (See SIDE WALL REMOVAL/INSTALLATION.)
-
- (5) Front heat duct (passenger-side) (See FRONT HEAT DUCT REMOVAL/INSTALLATION.)
-
- (6) Front scuff plate (passenger-side) (See FRONT SCUFF PLATE REMOVAL/INSTALLATION.)
-
- (7) Front side trim (passenger-side) (See FRONT SIDE TRIM REMOVAL/INSTALLATION.)
-
- (8) Lower panel (passenger-side) (See LOWER PANEL REMOVAL/INSTALLATION.)
-
2. Disconnect the blower motor connector.
3. Disconnect the air intake actuator connector.
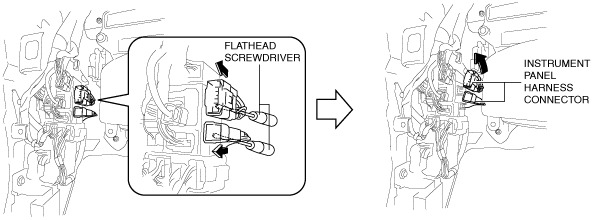
4. Disconnect the instrument panel harness connector.
5. Remove the instrument panel harness connector using a flathead screwdriver.
6. Set the instrument panel harness connector out of the way as shown in the figure.
7. Remove the blower unit installation nuts.
8. Remove the blower unit as shown in the figure.
-
Caution
-
• When removing the blower unit, move it little by little while verifying that there is no sticking in the surrounding parts or the wiring harness. If the blower unit is removed with excessive force, surrounding parts or the blower unit could be damaged.
9. Install in the reverse order of removal.