 |
REFRIGERANT PRESSURE SENSOR REMOVAL/INSTALLATION [MANUAL AIR CONDITIONER]
id0740a2817300
MZR 1.6, SKYACTIV-G 1.5, SKYACTIV-G 2.0, SKYACTIV-G 2.5
1. Disconnect the negative battery cable. (See NEGATIVE BATTERY CABLE DISCONNECTION/CONNECTION [MZR 1.6].)(See NEGATIVE BATTERY CABLE DISCONNECTION/CONNECTION [SKYACTIV-G 1.5, SKYACTIV-G 2.0, SKYACTIV-G 2.5].)
2. Discharge the refrigerant. (See REFRIGERANT CHARGING.)
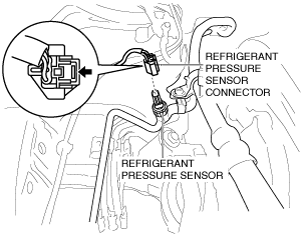
3. Disconnect the refrigerant pressure sensor connector.
am3uuw00010237
|
4. Loosen the refrigerant pressure sensor using two spanners.
am6xuw00006178
|
5. Remove the refrigerant pressure sensor.
am3uuw00010238
|
6. Install in the reverse order of removal. (See Refrigerant pressure sensor installation note.)
7. Perform the refrigerant system performance test. (See REFRIGERANT SYSTEM PERFORMANCE TEST.)
Refrigerant pressure sensor installation note
1. Apply compressor oil to the O-rings and connect the joints.
SKYACTIV-D 1.5, SKYACTIV-D 2.2
1. Disconnect the negative battery cable. (See NEGATIVE BATTERY CABLE DISCONNECTION/CONNECTION [SKYACTIV-D 1.5].)(See NEGATIVE BATTERY CABLE DISCONNECTION/CONNECTION [SKYACTIV-D 2.2].)
2. Discharge the refrigerant. (See REFRIGERANT CHARGING.)
3. Disconnect the connector.
am3zzw00017777
|
4. Detach the fastener.
5. Remove the bolts.
6. Remove the clip.
7. Set the PCM out of the way.
am3zzw00015158
|
8. Disconnect the refrigerant pressure sensor connector.
am3zzw00015159
|
9. Loosen the refrigerant pressure sensor using two spanners.
am6xuw00006178
|
10. Remove the refrigerant pressure sensor.
am3zzw00015160
|
11. Install in the reverse order of removal. (See Refrigerant pressure sensor installation note.)
12. Perform the refrigerant system performance test. (See REFRIGERANT SYSTEM PERFORMANCE TEST.)
Refrigerant pressure sensor installation note
1. Apply compressor oil to the O-rings and connect the joints.