FRONT SEAT SIDE COVER REMOVAL/INSTALLATION
id091300912100
-
Warning
-
• Handling a front seat equipped with a side air bag improperly can accidentally operate (deploy) the air bag, which may seriously injure you. Read the service warnings/cautions in the Workshop Manual before handling the front seat (side air bag integrated). (See
AIR BAG SYSTEM SERVICE WARNINGS.) (See
AIR BAG SYSTEM SERVICE CAUTIONS.)
• If the sliding mechanisms on both sides are not locked after assembling the front seat, the front seat will operate accidentally while the vehicle is driven, which could result in serious injury. After assembling the front seat, shake it up and down and verify that the sliding mechanism on the both sides are locked. (With manual seat)
-
Caution
-
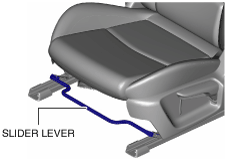
• After the front seat has been removed, if the slider lever is operated and the front seat is reinstalled with the left/right slide positions deviated, the adjuster unit could be damaged. After removing a front seat, do not operate the slider lever. (With manual seat)
• Verify that there are no malfunctions in the forward/back slide of the seat and in the adjuster unit after installing a front seat.
• When performing the procedure with a front seat removed from the vehicle, perform the procedure on a clean cloth so as not to damage or soil the seat.
With power seat system
1. Disconnect the negative battery cable and wait for 1 min or more. (See NEGATIVE BATTERY CABLE DISCONNECTION/CONNECTION [MZR 1.6].) (See NEGATIVE BATTERY CABLE DISCONNECTION/CONNECTION [SKYACTIV-G 1.5, SKYACTIV-G 2.0, SKYACTIV-G 2.5].) (See NEGATIVE BATTERY CABLE DISCONNECTION/CONNECTION [SKYACTIV-D 2.2].)(See NEGATIVE BATTERY CABLE DISCONNECTION/CONNECTION [SKYACTIV-D 1.5].)
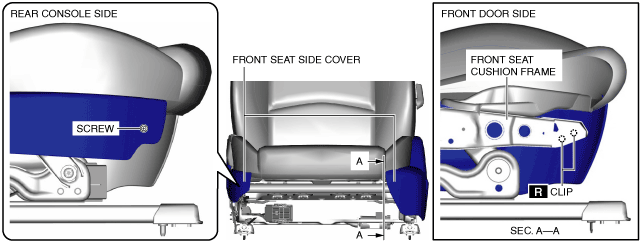
2. Remove the front seat. (Rear console side) (See FRONT SEAT REMOVAL/INSTALLATION.)
3. Remove the clips from the front seat cushion frame. (Front door side)
4. Remove the screw. (Rear console side)
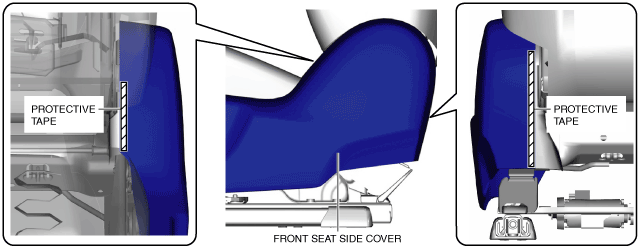
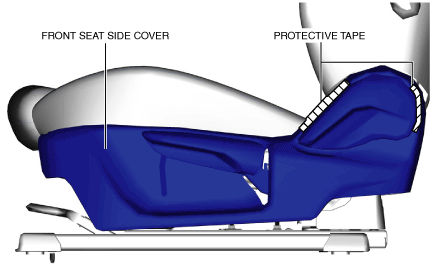
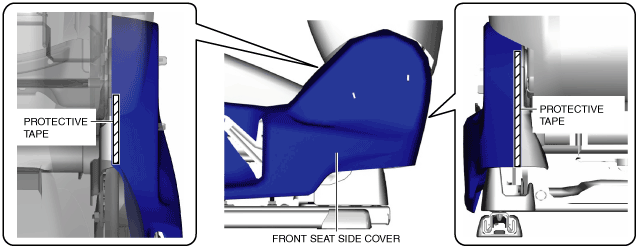
5. To prevent scratches or damage, affix protective tape to the position shown in the figure of the front seat side cover.
-
Caution
-
• If work using protective tape is performed in an area where the temperature can increase drastically or the protective tape is left adhered for a long period of time, tape adhesive could remain on the protective tape attachment part when the protective tape is peeled off. When applying protective tape, avoid areas where the temperature of the tape can increase drastically and peel off the protective tape soon after the work is completed.
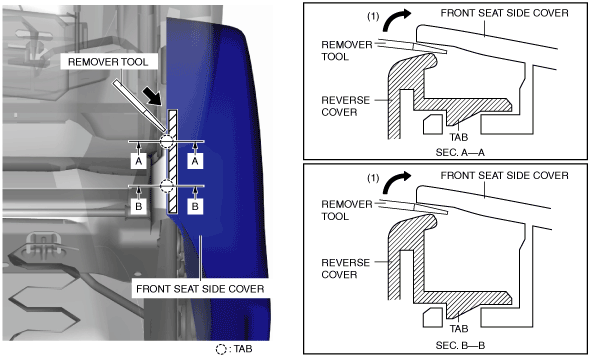
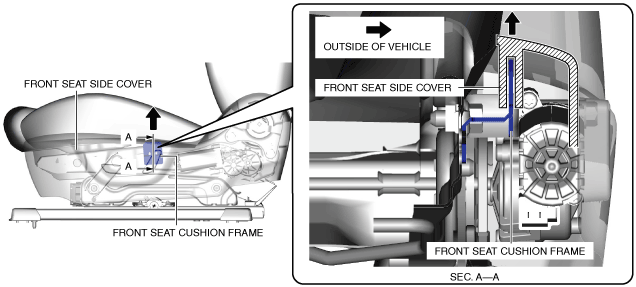
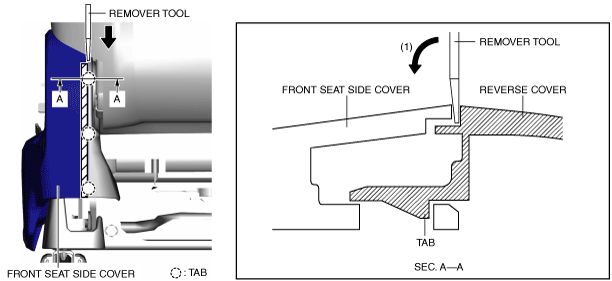
6. To detach the reverse cover tabs from the front seat side cover, insert a remover tool between the front seat side cover and the reverse cover.
7. Move the remover tool in the direction of arrow (1) shown in the figure and detach the reverse cover tab from the front seat side cover.
8. Detach all the reverse cover tabs and the pin from the front seat side cover.
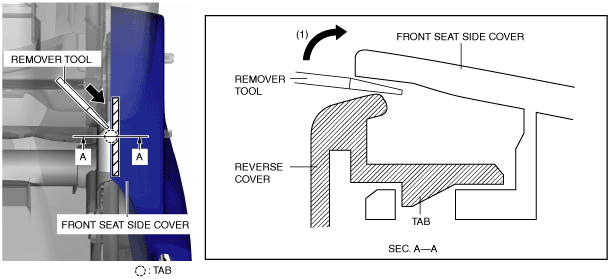
9. To detach the reverse cover tabs from the front seat side cover, insert the remover tool between the front seat side cover and the reverse cover.
10. Move the remover tool in the direction of arrow (1) shown in the figure and detach the reverse cover tabs from the front seat side cover.
11. Detach all the reverse cover tabs from the front seat side cover.
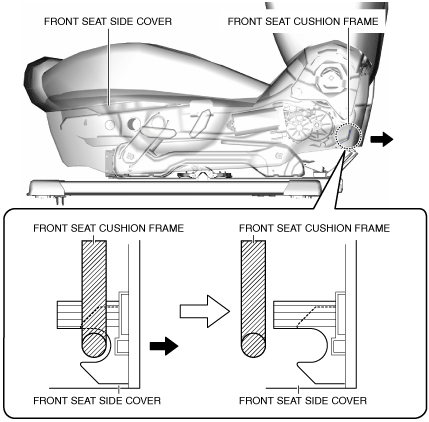
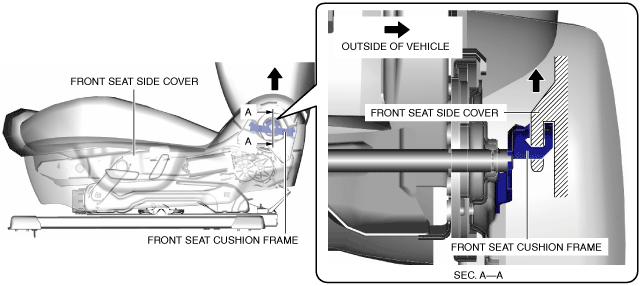
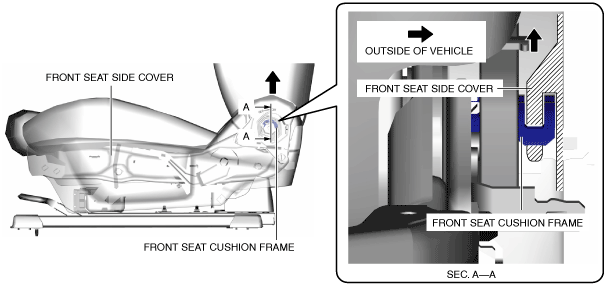
12. Move the front seat side cover in the direction of the arrow shown in the figure and detach the front seat side cover from the front seat cushion frame.
13. Move the front seat side cover in the direction of the arrow shown in the figure and detach the front seat side cover from the front seat cushion frame.
14. Move the front seat side cover in the direction of the arrow shown in the figure and detach the front seat side cover from the front seat cushion frame.
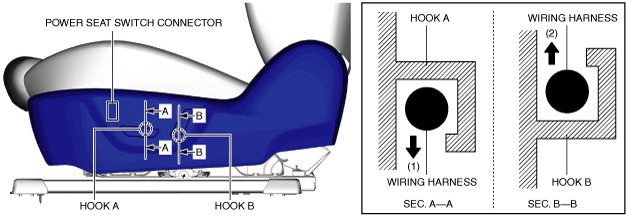
15. Disconnect the power seat switch connector. (Front door side)
16. Move the wiring harness in the order of arrows (1) and (2) shown in the figure and set the wiring harness away from hooks A and B. (Front door side)
17. Remove the front seat side cover.
18. Remove the power seat switch. (Front door side) (See POWER SEAT SWITCH REMOVAL/INSTALLATION.)
19. Install in the reverse order of removal.
Without power seat system
1. Disconnect the negative battery cable and wait for 1 min or more. (Rear console side) (See NEGATIVE BATTERY CABLE DISCONNECTION/CONNECTION [MZR 1.6].) (See NEGATIVE BATTERY CABLE DISCONNECTION/CONNECTION [SKYACTIV-G 1.5, SKYACTIV-G 2.0, SKYACTIV-G 2.5].) (See NEGATIVE BATTERY CABLE DISCONNECTION/CONNECTION [SKYACTIV-D 2.2].)(See NEGATIVE BATTERY CABLE DISCONNECTION/CONNECTION [SKYACTIV-D 1.5]
2. Remove the front seat. (Rear console side) (See FRONT SEAT REMOVAL/INSTALLATION.)
3. To prevent scratches or damage, affix protective tape to the position shown in the figure of the front seat side cover. (Front door side)
-
Caution
-
• If work using protective tape is performed in an area where the temperature can increase drastically or the protective tape is left adhered for a long period of time, tape adhesive could remain on the protective tape attachment part when the protective tape is peeled off. When applying protective tape, avoid areas where the temperature of the tape can increase drastically and peel off the protective tape soon after the work is completed.
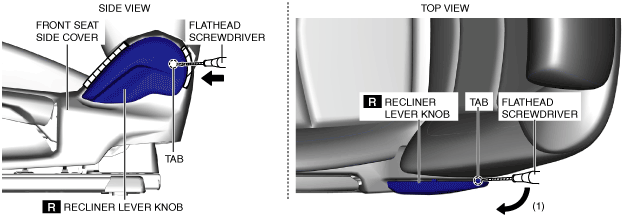
4. To detach the recliner lever knob tab from the front seat cushion frame, insert a tape-wrapped flathead screwdriver into the gap between the front seat side cover and the recliner lever knob. (Front door side)
5. Move the tape-wrapped flathead screwdriver in the direction of arrow (1) shown in the figure and detach the recliner lever knob tab from the front seat cushion frame. (Front door side)
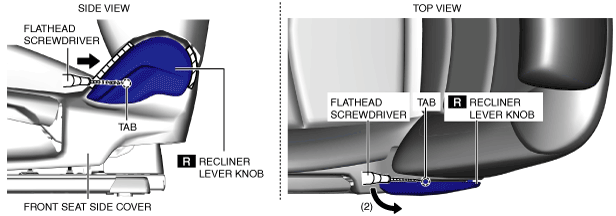
6. To detach the recliner lever knob tab from the front seat cushion frame, insert the tape-wrapped flathead screwdriver into the gap between the front seat side cover and the recliner lever knob. (Front door side)
7. Move the tape-wrapped flathead screwdriver in the direction of arrow (1) shown in the figure and detach the recliner lever knob tab from the front seat cushion frame. (Front door side)
8. Remove the recliner lever knob. (Front door side)
9. With the lifter lever raised in the direction of arrow (1) shown in the figure, move area A of the lifter lever knob in the direction of arrow (2), and with the lifter tab and lifter lever knob detached, remove the lifter lever knob from the lifter lever in the direction of arrow (3). (Driver's door side)
10. Remove the clips from the front seat cushion frame. (Front door side)
11. Remove the screw. (Rear console side)
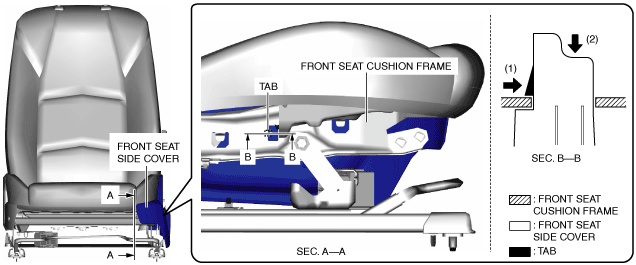
12. While pressing the front seat side cover tab in the direction of arrow (1) shown in the figure, move the front seat side cover in the direction of arrow (2) to detach the front seat side cover tab from the front seat cushion frame.
13. To prevent scratches or damage, affix protective tape to the position shown in the figure of the front seat side cover.
-
Caution
-
• If work using protective tape is performed in an area where the temperature can increase drastically or the protective tape is left adhered for a long period of time, tape adhesive could remain on the protective tape attachment part when the protective tape is peeled off. When applying protective tape, avoid areas where the temperature of the tape can increase drastically and peel off the protective tape soon after the work is completed.
14. To detach the reverse cover tabs from the front seat side cover, insert the remover tool between the front seat side cover and the reverse cover.
15. Move the remover tool in the direction of arrow (1) shown in the figure and detach the reverse cover tabs from the front seat side cover.
16. Detach all the reverse cover tabs from the front seat side cover.
17. To detach the reverse cover tabs from the front seat side cover, insert the remover tool between the front seat side cover and the reverse cover.
18. Move the remover tool in the direction of arrow (1) shown in the figure and detach the reverse cover tabs from the front seat side cover.
19. Move the front seat side cover in the direction of the arrow shown in the figure and detach the front seat side cover from the front seat cushion frame.
20. Remove the front seat side cover.
21. Install in the reverse order of removal.