 |
am3uuw00009904
PUSH BUTTON START INSPECTION
id091400006900
Resistance Inspection
1. Disconnect the negative battery cable. (See NEGATIVE BATTERY CABLE DISCONNECTION/CONNECTION [MZR 1.6].) (See NEGATIVE BATTERY CABLE DISCONNECTION/CONNECTION [SKYACTIV-G 1.5, SKYACTIV-G 2.0, SKYACTIV-G 2.5].) (See NEGATIVE BATTERY CABLE DISCONNECTION/CONNECTION [SKYACTIV-D 2.2].) (See NEGATIVE BATTERY CABLE DISCONNECTION/CONNECTION [SKYACTIV-D 1.5].)
2. Remove the upper column cover. (See COLUMN COVER REMOVAL/INSTALLATION.)
3. Remove the meter hood. (See METER HOOD REMOVAL/INSTALLATION.)
4. Remove the push button start. (See PUSH BUTTON START REMOVAL/INSTALLATION.)
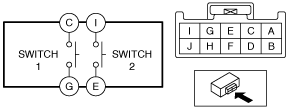
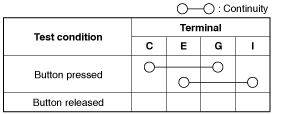
5. Verify that the continuity between the push button start terminals is as indicated in the table.
am3uuw00009904
|
am3uuw00009903
|
LED Illumination Inspection
1. Disconnect the negative battery cable. (See NEGATIVE BATTERY CABLE DISCONNECTION/CONNECTION [MZR 1.6].) (See NEGATIVE BATTERY CABLE DISCONNECTION/CONNECTION [SKYACTIV-G 1.5, SKYACTIV-G 2.0, SKYACTIV-G 2.5].) (See NEGATIVE BATTERY CABLE DISCONNECTION/CONNECTION [SKYACTIV-D 2.2].) (See NEGATIVE BATTERY CABLE DISCONNECTION/CONNECTION [SKYACTIV-D 1.5].)
2. Remove the upper column cover. (See COLUMN COVER REMOVAL/INSTALLATION.)
3. Remove the meter hood. (See METER HOOD REMOVAL/INSTALLATION.)
4. Remove the push button start. (See PUSH BUTTON START REMOVAL/INSTALLATION.)
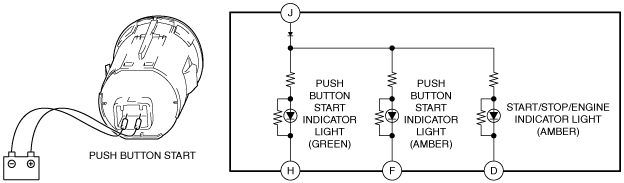
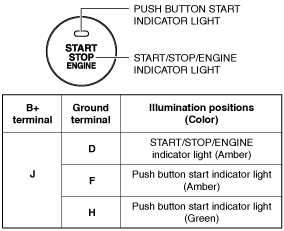
5. Apply battery positive voltage and connect the ground to the push button start terminals and verify that the LED illuminates as indicated in the table.
am3uuw00009905
|
am3uuw00009906
|