 |
am3zzw00016310
RADIATOR REMOVAL/INSTALLATION [SKYACTIV-G 1.5, SKYACTIV-G 2.0, SKYACTIV-G 2.5]
id0112h9801400
1. Disconnect the negative battery cable. (See NEGATIVE BATTERY CABLE DISCONNECTION/CONNECTION [SKYACTIV-G 1.5, SKYACTIV-G 2.0, SKYACTIV-G 2.5].)
2. Remove the front under cover No.1. (See FRONT UNDER COVER No.1 REMOVAL/INSTALLATION.)
3. Drain the engine coolant. (See ENGINE COOLANT REPLACEMENT [SKYACTIV-G 1.5, SKYACTIV-G 2.0, SKYACTIV-G 2.5].)
4. Remove the plug hole plate. (See PLUG HOLE PLATE REMOVAL/INSTALLATION [SKYACTIV-G 1.5, SKYACTIV-G 2.0, SKYACTIV-G 2.5].)
5. Remove the air cleaner, air hose and fresh air duct component. (See INTAKE-AIR SYSTEM REMOVAL/INSTALLATION [SKYACTIV-G 1.5, SKYACTIV-G 2.0, SKYACTIV-G 2.5].)
6. Remove the coolant reserve tank. (See COOLANT RESERVE TANK REMOVAL/INSTALLATION [SKYACTIV-G 1.5, SKYACTIV-G 2.0, SKYACTIV-G 2.5].)
7. Remove the cooling fan component. (See COOLING FAN MOTOR REMOVAL/INSTALLATION [SKYACTIV-G 1.5, SKYACTIV-G 2.0, SKYACTIV-G 2.5].)
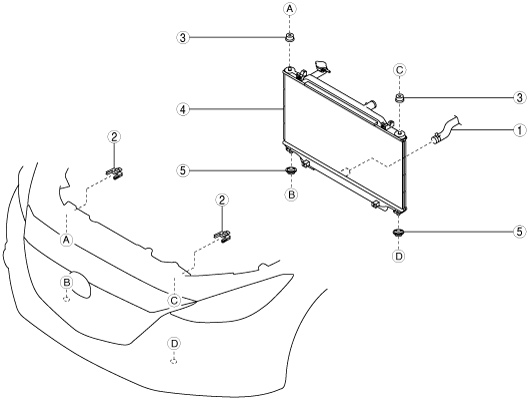
8. Remove in the order indicated in the table.
9. Install in the reverse order of removal.
10. Refill the engine coolant. (See ENGINE COOLANT REPLACEMENT [SKYACTIV-G 1.5, SKYACTIV-G 2.0, SKYACTIV-G 2.5].)
11. Inspect for engine coolant leakage. (See ENGINE COOLANT LEAKAGE INSPECTION [SKYACTIV-G 1.5, SKYACTIV-G 2.0, SKYACTIV-G 2.5].)
am3zzw00016310
|
|
1
|
Lower radiator hose
|
|
2
|
Upper mount rubber bracket
|
|
3
|
Upper mount rubber
|
|
4
|
Radiator
(See Radiator Removal Note.)
|
|
5
|
Lower mount rubber
|
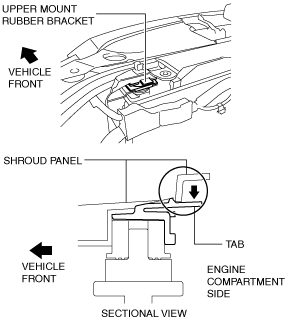
Upper Mount Rubber Bracket Removal Note
1. While pressing down the upper mount rubber bracket tab lightly in the direction of the arrow shown in the figure, pull out the upper mount rubber bracket toward the vehicle rear.
am3zzw00015040
|
2. Remove the upper mount rubber bracket.
Radiator Removal Note
1. To prevent damage to the radiator core, protect it by covering the radiator surface with cardboard.
2. Lift the radiator and remove it from the radiator installation holes on the shroud panel.
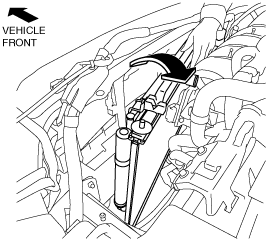
3. Move the radiator and condenser to the engine side. (with A/C)
am3zzw00015041
|
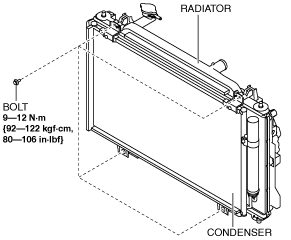
4. Remove the bolts which secure the condenser to the radiator. (with A/C)
am3uuw00011918
|
5. Remove the radiator from above the engine compartment.