 |
am3zzw00017136
COOLANT CONTROL VALVE REMOVAL/INSTALLATION [SKYACTIV-D 1.5]
id0112q2225000
1. Turn the steering wheel completely to the right.
2. Disconnect the negative battery cable. (See NEGATIVE BATTERY CABLE DISCONNECTION/CONNECTION [SKYACTIV-D 1.5].)
3. Remove the front under cover No.1 and No.2. (See FRONT UNDER COVER No.1 REMOVAL/INSTALLATION.) (See FRONT UNDER COVER No.2 REMOVAL/INSTALLATION.)
4. Drain the engine coolant. (See ENGINE COOLANT REPLACEMENT [SKYACTIV-D 1.5].)
5. Remove the front splash shield (RH). (See SPLASH SHIELD REMOVAL/INSTALLATION.)
6. Remove the drive belt. (See DRIVE BELT REMOVAL/INSTALLATION [SKYACTIV-D 1.5].)
7. Remove the engine cover. (See ENGINE COVER REMOVAL/INSTALLATION [SKYACTIV-D 1.5].)
8. Remove the generator. (See GENERATOR REMOVAL/INSTALLATION [SKYACTIV-D 1.5].)
9. Remove the generator bracket. (See ENGINE DISASSEMBLY/ASSEMBLY [SKYACTIV-D 1.5].)
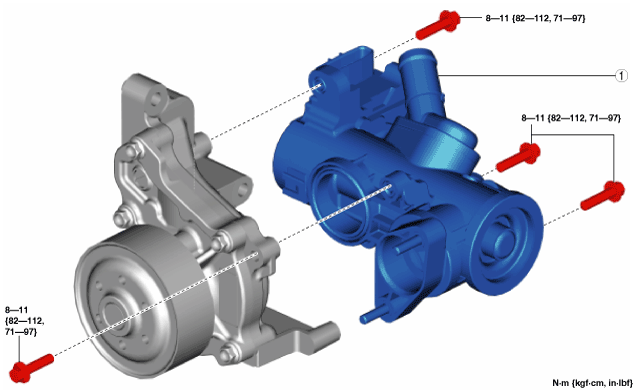
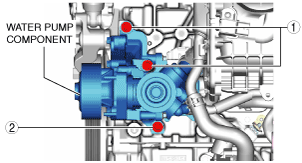
10. Remove in the order indicated in the table.
11. Install in the reverse order of removal.
12. Refill the engine coolant. (See ENGINE COOLANT REPLACEMENT [SKYACTIV-D 1.5].)
13. Inspect for engine coolant leakage. (See ENGINE COOLANT LEAKAGE INSPECTION [SKYACTIV-D 1.5].)
Step 1
am3zzw00017136
|
|
1
|
Lower radiator hose component
|
|
2
|
Water pump component
|
Step 2
ac3wzw00000655
|
|
1
|
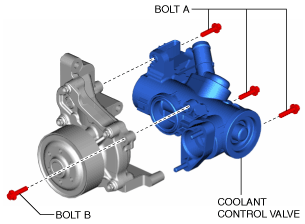
Coolant control valve
|
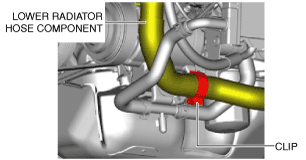
Lower Radiator Hose Component Removal Note
1. Remove the clip shown in the figure.
am3zzw00017137
|
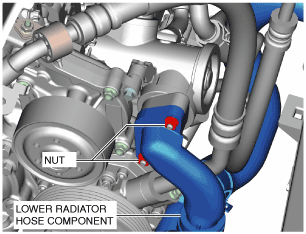
2. Remove the nuts shown in the figure.
am3zzw00017138
|
3. Disconnect the lower radiator hose component (engine radiator side).
4. Remove the lower radiator hose component from the underside of the vehicle.
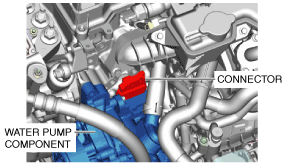
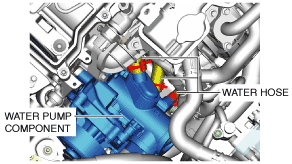
Water Pump Component Removal Note
1. Remove the A/C compressor with the pipes connected and secure the A/C compressor using wire or rope so that it is out of the way. (See A/C COMPRESSOR REMOVAL/INSTALLATION [SKYACTIV-D 1.5].)
2. Place an appropriate container under the engine to collect the draining engine coolant.
3. Remove the water pump component installation bolts and perform the following procedures while setting the water pump component aside.
ac3wzw00000658
|
ac3wzw00000659
|
4. Remove the water pump component.
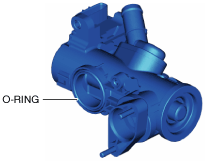
Coolant Control Valve Installation Note
1. Visually inspect the engine coolant control valve O-ring.
ac3wzw00000660
|
2. Install the coolant control valve using the following procedure.
ac3wzw00000661
|
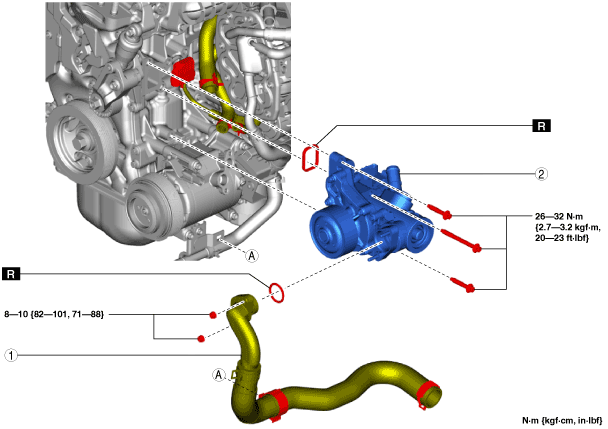
Water Pump Component Installation Note
1. Insert a new water pump gasket into the groove of the water pump component.
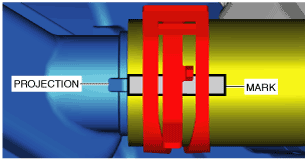
2. Connect the water hose to the water pump component so that the projection position is aligned with the mark.
ac3wzw00000659
|
ac3wzw00002399
|
3. Connect the water pump component to the connector.
ac3wzw00000658
|
4. Tighten the water pump component installation bolts in the order shown in the figure.
ac3wzw00000663
|
Lower Radiator Hose Component Installation Note
1. Install the lower radiator hose component to the water pump component from the underside of the vehicle.
2. Connect the lower radiator hose component (engine radiator side) to the engine radiator.
3. Tighten the lower radiator hose component installation nuts.
am3zzw00017138
|
4. Install the clip shown in the figure.
am3zzw00017137
|