 |
EXHAUST SYSTEM REMOVAL/INSTALLATION [SKYACTIV-D 2.2]
id0115z7800200
Operation After Replacing Catalytic Converter
1. If the catalytic converter is replaced, perform the following procedure.
|
STEP |
ACTION |
PAGE/CONDITION |
|---|---|---|
|
1
|
Perform DPF data reset procedure.
|
|
|
2
|
Wait for 20 s.
|
—
|
|
3
|
Perform KOEO self-test procedure.
|
|
|
4
|
Perform KOER self-test procedure.
|
|
|
5
|
Perform fuel injector injection amount correction.
|
|
|
6
|
Perform compulsory diesel particulate filter regeneration.
|
|
|
7
|
Clear the DTCs.
|
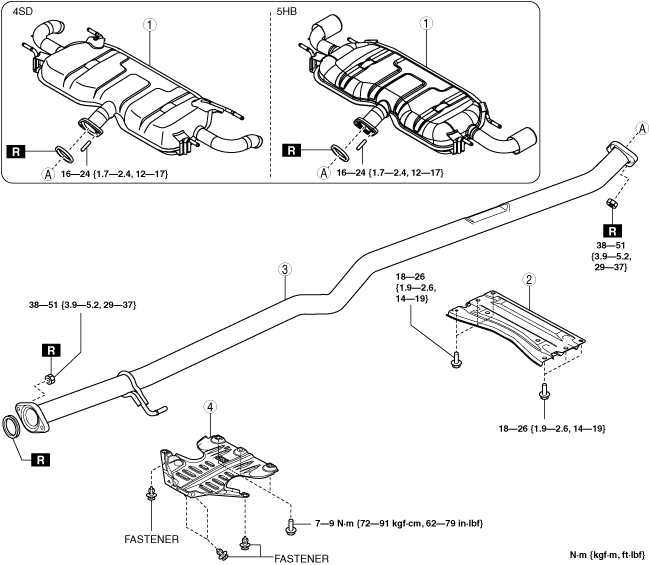
Exhaust System Removal/Installation
1. Disconnect the negative battery cable. (See NEGATIVE BATTERY CABLE DISCONNECTION/CONNECTION [SKYACTIV-D 2.2].)
2. Remove in the order shown in the figure.
3. Remove the exhaust system insulator. (See Exhaust system insulator removal/installation.)
4. Install in the reverse order of removal.
Step 1
am3zzw00015017
|
|
1
|
Main silencer
|
|
2
|
Tunnel member
|
|
3
|
Middle pipe
|
|
4
|
Plate
|
Step 2
am3zzw00037630
|
|
1
|
Catalytic converter insulator
|
|
2
|
Insulator
|
|
3
|
Exhaust hose
|
|
4
|
Catalytic converter upper bracket
|
|
5
|
Catalytic converter lower bracket
|
|
6
|
Catalytic converter
|
Exhaust system insulator removal/installation
1. Remove in the order shown in the figure.
2. Install in the reverse order of removal.
am3zzw00013801
|
|
1
|
Insulator (rear)
|
|
2
|
Insulator (middle)
|
|
3
|
Insulator (front)
|
Insulator (rear) removal note
1. Using a hammer and punch (diam. 2—2.8 mm{0.08—0.11 in}), punch out the mandrel.
am6zzw00011733
|
2. Pull out and remove the flange using a drill (diam. 5 mm {0.2 in}).
am6zzw00011734
|
Catalytic converter insulator removal note
1. Remove the battery. (See BATTERY REMOVAL/INSTALLATION [SKYACTIV-D 2.2].)
2. Remove the catalytic converter insulator.
Catalytic converter lower bracket removal note
1. Remove the front crossmember. (See FRONT CROSSMEMBER REMOVAL/INSTALLATION [SKYACTIV-D 1.5, SKYACTIV-D 2.2].)
2. Remove the catalytic converter lower bracket.
Catalytic converter removal note
1. Disconnect the exhaust gas temperature sensor No.2 connector.
2. Disconnect the exhaust gas sensor No.3 connector.
3. Remove the exhaust gas sensor No.3 wiring harness installation nuts. (See EXHAUST GAS TEMPERATURE SENSOR REMOVAL/INSTALLATION [SKYACTIV-D 2.2].)
4. Disconnect the A/F sensor connector.
5. Remove the catalytic converter.
Catalytic converter installation note
1. Temporarily tighten bolt and nuts shown in the figure.
ac5wzw00005313
|
2. Tighten the bolt and nuts in the other shown in the figure.
ac5wzw00005314
|
3. After installation, verify that the tightening torque for the bolt and nuts is correct.
Catalytic converter bracket installation note
1. Temporarily tighten bolts 1 and bolt 2 shown in the figure.
ac5wzw00005315
|
2. Tighten bolts 1 shown in the figure.
3. Tighten bolts 2 shown in the figure.
4. After installation, verify that the tightening torque for bolts is correct.
5. Temporarily tighten bolts 3 and bolt 4 shown in the figure.
ac5wzw00005316
|
6. Tighten the bolts in the order shown in the figure.
7. Temporarily tighten bolts 5 and bolt 6 shown in the figure.
ac5wzw00005317
|
8. Tighten the bolts in the order shown in the figure.
9. After installation, verify that the tightening torque for bolts is correct.
Catalytic converter upper bracket installation note
Catalytic converter insulator installation note
1. Temporarily tighten the catalytic converter insulator installation bolts.
2. Tighten the bolts in the order shown in the figure.
ac5wzw00005318
|