 |
VEHICLE CONTROL MODULE (V/C-MODULE) REMOVAL/INSTALLATION [MAZDA RADAR CRUISE CONTROL (MRCC) SYSTEM]
id0120g0000600
1. Disconnect the negative battery cable. (See NEGATIVE BATTERY CABLE DISCONNECTION/CONNECTION [SKYACTIV-D 1.5].)(See NEGATIVE BATTERY CABLE DISCONNECTION/CONNECTION [SKYACTIV-D 2.2].) (See NEGATIVE BATTERY CABLE DISCONNECTION/CONNECTION [SKYACTIV-G 1.5, SKYACTIV-G 2.0, SKYACTIV-G 2.5].)
2. Remove the front scuff plate. (RH) (See FRONT SCUFF PLATE REMOVAL/INSTALLATION.)
3. Remove the front side trim. (RH) (See FRONT SIDE TRIM REMOVAL/INSTALLATION.)
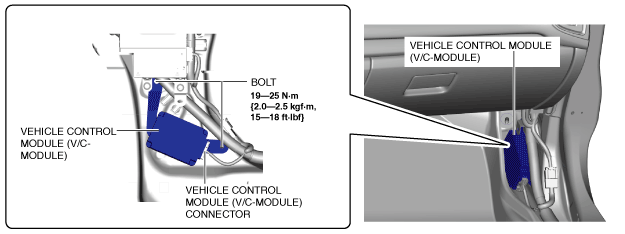
4. Disconnect the vehicle control module (V/C-module) connector.
am3zzw00014632
|
5. Remove the bolts.
6. Remove the vehicle control module (V/C-module).
7. Install in the reverse order of removal.
8. When newly replacing the vehicle control module (V/C-module), switch the ignition ON and perform the vehicle control module (V/C-module) automatic configuration.
9. Perform the radar sensor aiming adjustment. (See RADAR SENSOR AIMING [MAZDA RADAR CRUISE CONTROL (MRCC) SYSTEM].)
10. Clear the DTCs. (See CLEARING DTC [VEHICLE CONTROL MODULE (V/C-MODULE)].)