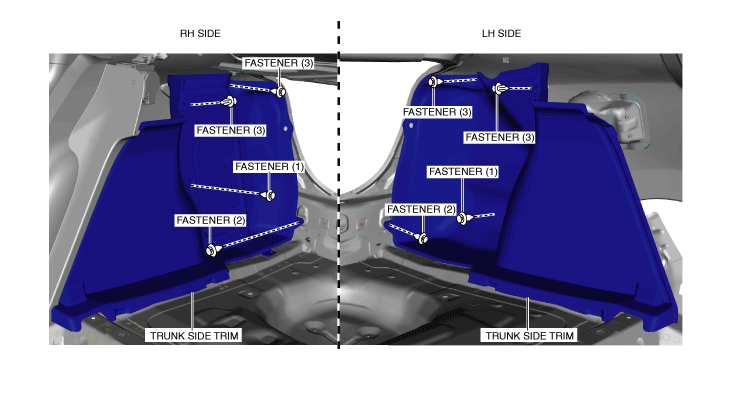
 |
TRUNK SIDE TRIM REMOVAL/INSTALLATION
id091700803100
4SD
1. Remove the following parts:
2. Remove fasteners (1).
am3zzw00017348
|
3. Remove fasteners (2).
4. Remove fasteners (3).
5. Move the trunk side trim in the direction of arrows (4) shown in the figure, and remove the trunk side trim while setting the tire house trim aside.
am3zzw00017349
|
6. Install in the reverse order of removal.
5HB
1. Disconnect the negative battery cable. (See NEGATIVE BATTERY CABLE DISCONNECTION/CONNECTION [MZR 1.6].) (See NEGATIVE BATTERY CABLE DISCONNECTION/CONNECTION [SKYACTIV-G 1.5, SKYACTIV-G 2.0, SKYACTIV-G 2.5].) (See NEGATIVE BATTERY CABLE DISCONNECTION/CONNECTION [SKYACTIV-D 2.2].)(See NEGATIVE BATTERY CABLE DISCONNECTION/CONNECTION [SKYACTIV-D 1.5].)
2. Remove the following parts:
3. Remove the fastener (1).
am3zzw00015539
|
4. Remove the fastener (2).
5. Remove fasteners (3).
6. Remove the pin, then remove the cargo hook cover.
am3zzw00015540
|
7. Remove the trunk side trim in the direction of the arrow (4) shown in the figure. (See Trunk Side Trim Installation Note.)
am3zzw00015541
|
8. Install in the reverse order of removal.
Trunk Side Trim Installation Note
1. If the cargo compartment light wiring harness is routed incorrectly, the trunk side upper trim will interfere with the cargo compartment light wiring harness when installing the trunk side upper trim which could damage the cargo compartment light wiring harness. When routing the cargo compartment light wiring harness, route it through the slit area shown in the figure. (LH only)
am3uuw00012347
|