 |
RAIN SENSOR REMOVAL/INSTALLATION
id091900800500
Without Forward Sensing Camera (FSC) and Smart City Brake Support (SCBS)
1. Disconnect the negative battery cable. (See NEGATIVE BATTERY CABLE DISCONNECTION/CONNECTION [MZR 1.6].) (See NEGATIVE BATTERY CABLE DISCONNECTION/CONNECTION [SKYACTIV-G 1.5, SKYACTIV-G 2.0, SKYACTIV-G 2.5].) (See NEGATIVE BATTERY CABLE DISCONNECTION/CONNECTION [SKYACTIV-D 2.2].)(See NEGATIVE BATTERY CABLE DISCONNECTION/CONNECTION [SKYACTIV-D 1.5].)
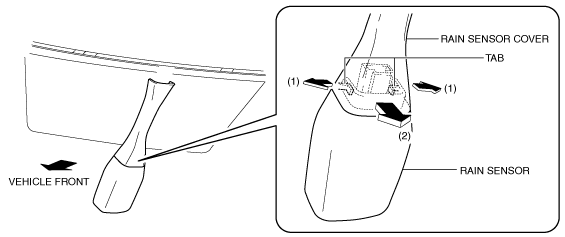
2. Open the rain sensor cover in the direction of arrows (1) shown in the figure and detach the rain sensor cover tabs from the rain sensor.
am3uuw00010561
|
3. Remove the rain sensor cover from the rain sensor in the direction of arrow (2) shown in the figure.
4. Disconnect the connector.
am3uuw00010562
|
5. Insert the remover tool into the gap between the rain sensor and the tab (1).
am3uuw00010563
|
6. Move the remover tool in the direction of arrow (3) shown in the figure and detach the tab (1) from the rain sensor.
7. Insert the remover tool into the gap between the rain sensor and the tab (2).
8. Move the remover tool in the direction of arrow (4) shown in the figure and detach the tab (2) from the rain sensor.
9. Pull out the tab from the rain sensor.
10. Move the rain sensor in the direction of arrow (5) shown in the figure and pull out the rain sensor from the bracket.
am3uuw00010564
|
11. Peel off the rain sensor protective sheet from the rain sensor.
am3uuw00010565
|
12. Install in the reverse order of removal. (See Rain Sensor Installation Note.)
13. If the rain sensor is replaced, perform the following sensitivity setting procedure for the auto lights.
With Forward Sensing Camera (FSC) or Smart City Brake Support (SCBS)
1. Disconnect the negative battery cable. (See NEGATIVE BATTERY CABLE DISCONNECTION/CONNECTION [MZR 1.6].) (See NEGATIVE BATTERY CABLE DISCONNECTION/CONNECTION [SKYACTIV-G 1.5, SKYACTIV-G 2.0, SKYACTIV-G 2.5].) (See NEGATIVE BATTERY CABLE DISCONNECTION/CONNECTION [SKYACTIV-D 2.2].)(See NEGATIVE BATTERY CABLE DISCONNECTION/CONNECTION [SKYACTIV-D 1.5].)
2. Remove the cover. (See FORWARD SENSING CAMERA (FSC) REMOVAL/INSTALLATION.)
3. Disconnect the connector.
am3uuw00010566
|
4. Insert the remover tool into the gap between the rain sensor and the tab (1).
am3uuw00010567
|
5. Move the remover tool in the direction of arrow (1) shown in the figure and detach the tab (1) from the rain sensor.
6. Insert the remover tool into the gap between the rain sensor and the tab (2).
7. Move the remover tool in the direction of arrow (2) shown in the figure and detach the tab (2) from the rain sensor.
8. Pull out the tab from the rain sensor.
9. Move the rain sensor in the direction of arrow (3) shown in the figure and pull out the rain sensor from the bracket.
am3uuw00010568
|
10. Peel off the rain sensor protective sheet from the rain sensor.
am3uuw00010565
|
11. Install in the reverse order of removal. (See Rain Sensor Installation Note.)
12. If the rain sensor is replaced, perform the following sensitivity setting procedure for the auto lights.
Rain Sensor Installation Note
1. Wipe off any oil or dirt from the rain sensor lens and the windshield using a clean rag.
am3uuw00010569
|
2. Peel off adhesive tape backing A from a new rain sensor protective sheet.
am3uuw00010570
|
3. Adhere a new rain sensor protective sheet to the rain sensor lens.
am3uuw00010571
|
4. Peel off adhesive tape backing B from the rain sensor protective sheet.
am3uuw00010572
|
5. Move the rain sensor in the direction of arrow (1) shown in the figure and install the rain sensor to the bracket.
am3uuw00010573
|
6. Press the rain sensor in the direction (direction of arrow (2) shown in figure) of the windshield and press out any air bubbles.
am3uuw00010574
|
7. Verify that there are no air bubbles between the rain sensor and the windshield.