 |
ac5wzw00005908
TURBOCHARGER INSPECTION [SKYACTIV-D 2.2]
id0113z7801000
Prior Inspection
1. Inspect the idle speed. (See ENGINE TUNE-UP [SKYACTIV-D 2.2].)
2. Inspect the cooling system. (See NO.22 COOLING SYSTEM CONCERNS-OVERHEATING [SKYACTIV-D 2.2].)
3. Verify if a Soot Accumulation in DPF too high or DPF Inspection Required message is displayed in the TFT LCD.
4. Verify if the fuel tank level warning light is illuminated.
5. Inspect the fuel filter. (See FUEL FILTER INSPECTION [SKYACTIV-D 2.2].)
6. Inspect the vacuum pump and vacuum lines. (See VACUUM PUMP INSPECTION.) (See VACUUM LINE INSPECTION.)
7. Inspect the cooling fan. (See COOLING FAN MOTOR REMOVAL/INSTALLATION [SKYACTIV-D 2.2].)
8. Inspect the fan control module. (See FAN CONTROL MODULE INSPECTION [SKYACTIV-D 2.2].)
9. Inspect the charge air cooler. (See CHARGE AIR COOLER INSPECTION [SKYACTIV-D 2.2].)
10. Inspect the intake-air system related hoses for disconnection.
11. Inspect the air cleaner element. (See AIR CLEANER ELEMENT INSPECTION [SKYACTIV-D 2.2].)
Symptom Troubleshooting Selection
|
MALFUNCTION |
DIAGNOSTIC SYSTEM INSPECTION ITEMS |
|---|---|
|
• Turbocharger malfunction
• Compressor bypass valve malfunction
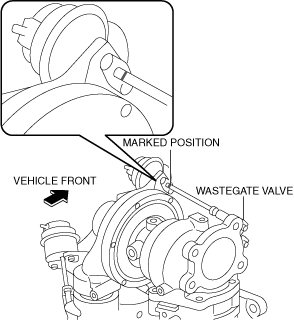
• Wastegate valve malfunction
|
|
|
• Turbocharger shaft seal malfunction
|
(See Oil Leakage Inspection.)
|
|
• Interference with turbocharger rotation mechanism housing
|
(See Abnormal Noise Inspection.)
|
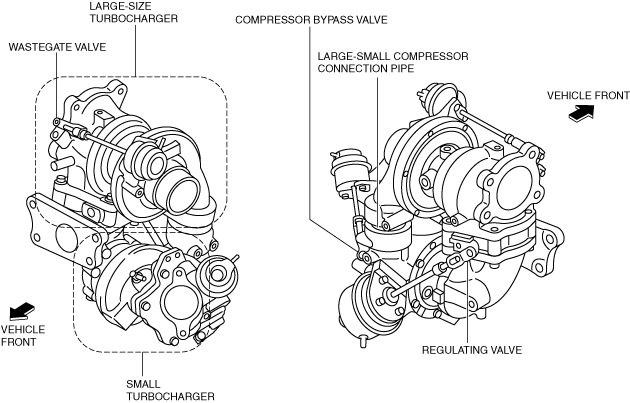
Structural view
ac5wzw00005908
|
Charging Deficiency Inspection
Malfunction location determination (large-type turbocharger, small-type turbocharger)
1. Shift the selector lever (ATX) or shift lever (MTX) to the following position:
2. Start the engine.
3. Connect the M-MDS to the DLC-2.
4. Display PID MAP and BARO using the data logger function.
5. Depress the accelerator pedal and verify the MAP and BARO value when the engine rotation speed rises to 3,500 rpm or more.
Large-type turbocharger charging deficiency inspection
Possible cause
|
MALFUNCTION OCCURRENCE LOCATION |
PHENOMENON |
CAUSE |
INSPECTION ORDER |
|
|---|---|---|---|---|
|
Large-type compressor side
|
Large-small compressor connection pipe
|
Pressurization leak
|
Connection looseness or disconnection of large-small compressor connection pipe
|
1
|
|
Compressor bypass valve
|
Pressurization leak
|
Crack in compressor bypass valve outlet
|
2
|
|
|
Small valve opening angle
|
Valve sticking
Rod link deformity
Vacuum malfunction in compressor bypass solenoid valve
|
6
|
||
|
Large-type turbine side
|
Between turbine inlet and cylinder head
Regulating valve
Between turbine outlet and catalytic converter
|
Exhaust gas leakage
|
Cracks
Gasket deterioration
|
3, 11
|
|
Regulating valve
|
Small valve opening angle
|
Valve sticking
Rod link deformity, deviation, interference
Vacuum malfunction in regulating solenoid valve
|
4, 13
|
|
|
Exhaust gas leakage
|
Cracks
|
12
|
||
|
Wastegate valve
|
Large valve opening angle
|
Valve sticking
Rod link deformity
Vacuum malfunction in wastegate solenoid valve
|
5
|
|
|
Exhaust gas leakage
|
Valve deformity
Foreign matter adhering to seal surface
|
10
|
||
|
Large-type compressor wheel
|
Wheel damage or sticking
|
Foreign matter penetration
Rotation exceeds threshold maximum
|
7
|
|
|
Large-type turbocharger shaft or bearing
|
Sticking or dislodged, broken large-type compressor installation nut
|
Foreign matter penetration
Deficient lubrication
|
8
|
|
|
Large-type turbine wheel
|
Wheel damage or sticking
|
Foreign matter penetration
Rotation exceeds threshold maximum
|
9
|
|
Large-type turbocharger charging deficiency inspection (on-vehicle inspection)
|
STEP |
INSPECTION |
RESULTS |
ACTION |
|||
|---|---|---|---|---|---|---|
|
1
|
INSPECTION OF PRESSURIZATION LEAKAGE FROM LARGE-SMALL COMPRESSOR CONNECTION PIPE
• Inspect for disconnection, looseness in large-small compressor connection pipe.
• If there is even slight looseness, apply soapy water and verify if bubbles are produced while running the engine under no load (selector lever in P position, engine speed 3000 to 3500 rpm.)
• Are bubbles produced?
|
Yes
|
Replace the turbocharger.
|
|||
|
No
|
Go to the next step.
|
|||||
|
2
|
INSPECTION OF PRESSURIZATION LEAKAGE FROM COMPRESSOR BYPASS VALVE OUTLET
• Inspect the compressor bypass valve outlet area for cracks.
• If cracking locations cannot be discerned, apply soapy water and verify if bubbles are produced while running the engine under no load (selector lever in P position, engine speed 3000 to 3500 rpm.)
• Are there cracks or bubbles produced?
|
Yes
|
Replace the turbocharger.
|
|||
|
No
|
Go to the next step.
|
|||||
|
3
|
INSPECTION OF EXHAUST GAS LEAKAGE FROM LARGE-TYPE TURBINE SIDE
• Inspect the following locations for the sound of exhaust gas leakage.
• Is there exhaust gas leakage?
|
Yes
|
Go to Step 11 of the large-type turbocharger charging deficiency inspection (single-unit inspection).
|
|||
|
No
|
Go to the next step.
|
|||||
|
4
|
REGULATING VALVE OPENING ANGLE INSPECTION
• Verify PID REGVP and REGVP_DSD using the M-MDS data logger function.
• Maintain the engine speed at 3,500 rpm or more for 10 s.
• Is the difference between REGVP and REGVP_DSD 1.0 mm {0.039 in} or more?
|
Yes
|
Replace the turbocharger.
|
|||
|
No
|
Inspect the vacuum pipe.
If it is normal, go to the next step.
If there is any malfunction, repair or replace the malfunctioning part.
|
|||||
|
5
|
WASTEGATE VALVE OPENING ANGLE INSPECTION
• Perform the following inspections:
• Is there any malfunction in the inspection results?
|
Yes
|
Replace the turbocharger.
|
|||
|
No
|
Go to the next step.
|
|||||
|
6
|
COMPRESSOR BYPASS VALVE OPENING ANGLE INSPECTION
• Perform the following inspections:
• Is there any malfunction in the inspection results?
|
Yes
|
Replace the turbocharger.
|
|||
|
No
|
Go to the next step.
|
|||||
|
7
|
LARGE-TYPE COMPRESSOR WHEEL INSPECTION
• Remove the intake air hose and, using a mirror, visually inspect the wheel condition from the intake air side.
• Is there deformity or damage?
|
Yes
|
Replace the turbocharger.
|
|||
|
No
|
Go to the next step.
|
|||||
|
8
|
LARGE-TYPE TURBOCHARGER SHAFT AND BEARING INSPECTION
• Rotate the induction side by hand and inspect for play in the axial direction.
• Does the shaft not rotate smoothly or is there play of 0.5 mm {0.02 in} or more?
|
Yes
|
Replace the turbocharger.
|
|||
|
No
|
Go to the next step.
|
|||||
|
9
|
LARGE-TYPE TURBINE WHEEL INSPECTION
• Remove the catalytic converter and visually inspect the wheel condition from the exhaust gas side.
• Is there deformity or damage?
|
Yes
|
Replace the turbocharger.
|
|||
|
No
|
Go to the next step.
|
|||||
|
10
|
INSPECTION OF GAS LEAKAGE FROM WASTEGATE VALVE
• Remove the catalytic converter and visually inspect the valve from the exhaust gas side. (If there is foreign matter adhering such as carbon to the seal surface, remove it.)
• Is there deformity or damage?
|
Yes
|
Replace the turbocharger.
|
|||
|
No
|
Remove the turbocharger.
Go to Step 13 of the large-type turbocharger charging deficiency inspection (single-unit inspection).
|
Large-type turbocharger charging deficiency inspection (single-unit inspection)
|
STEP |
INSPECTION |
RESULTS |
ACTION |
|---|---|---|---|
|
11
|
INSPECTION OF EXHAUST GAS LEAKAGE FROM TURBOCHARGER INSTALLATION AREA
• Visually inspect the following parts:
• Is there evidence of exhaust gas leakage on the gasket*, or cracks spreading to the edge of the gasket?
|
Yes
|
If there is evidence of exhaust gas leakage on the gasket, replace with an appropriate gasket.
If there are cracks on the edge of the gasket, replace the turbocharger.
|
|
No
|
Go to the next step.
|
||
|
12
|
INSPECT FOR EXHAUST GAS LEAKAGE FROM THE TURBINE HOUSING OR REGULATING VALVE
• Are there cracks penetrating the turbine housing and regulating valve housing?
|
Yes
|
Replace the turbocharger.
|
|
No
|
Go to the next step.
|
||
|
13
|
INSPECTION OF REGULATING VALVE OPENING ANGLE
• Visually inspect the link area of the regulating valve.
• Is there deviation or interference?
|
Yes
|
Replace the turbocharger.
|
|
No
|
The large-type turbocharger is normal.
|
Small-type turbocharger charging deficiency inspection
Possible cause
|
MALFUNCTION OCCURRENCE LOCATION |
PHENOMENON |
CAUSE |
INSPECTION ORDER |
|
|---|---|---|---|---|
|
Small-type compressor side
|
Large-small compressor connection pipe
|
Pressurization leak
|
Connection looseness or disconnection of large-small compressor connection pipe
|
1
|
|
Compressor bypass valve
|
Pressurization leak
|
Crack in compressor bypass valve outlet
|
2
|
|
|
Large valve opening angle
|
Valve sticking
Rod link deformity or disconnection
Vacuum malfunction in compressor bypass solenoid valve
|
6
|
||
|
Exhaust gas leakage
|
Valve deformity
Foreign matter adhering to seal surface
|
7
|
||
|
Small-type turbine side
|
Between turbine inlet and cylinder head
Flanges on both sides of regulating valve
Between turbine outlet and catalytic converter
|
Exhaust gas leakage
|
Cracks
Gasket deterioration
|
3, 10
|
|
Regulating valve
|
Large valve opening angle
|
Valve sticking
Rod link deformity
Vacuum malfunction in regulating solenoid valve
|
4, 5, 12
|
|
|
Exhaust gas leakage
|
Cracks
Valve deformity
Foreign matter adhering to seal surface
|
10, 11
|
||
|
Small-type compressor wheel
|
Wheel damage or sticking
|
Foreign matter penetration
Rotation exceeds threshold maximum
|
8
|
|
|
Small-type turbocharger shaft or bearing
|
Sticking or dislodged, broken small-type compressor installation nut
|
Foreign matter penetration
Deficient lubrication
|
9
|
|
Small-type turbocharger charging deficiency inspection (on-vehicle inspection)
|
STEP |
INSPECTION |
RESULTS |
ACTION |
|---|---|---|---|
|
1
|
INSPECTION OF PRESSURIZATION LEAKAGE FROM LARGE-SMALL COMPRESSOR CONNECTION PIPE
• Inspect for disconnection, looseness in large-small compressor connection pipe.
• If there is even slight looseness, apply soapy water and verify if bubbles are produced while running the engine under no load (selector lever in P position, engine speed 3000 to 3500 rpm.)
• Are bubbles produced?
|
Yes
|
Replace the turbocharger.
|
|
No
|
Go to the next step.
|
||
|
2
|
INSPECTION OF PRESSURIZATION LEAKAGE FROM COMPRESSOR BYPASS VALVE OUTLET
• Inspect the compressor bypass valve outlet area for cracks.
• If cracking locations cannot be discerned, apply soapy water and verify if bubbles are produced while running the engine under no load (selector lever in P position, engine speed 3000 to 3500 rpm.)
• Are there cracks or bubbles produced?
|
Yes
|
Replace the turbocharger.
|
|
No
|
Go to the next step.
|
||
|
3
|
INSPECTION OF EXHAUST GAS LEAKAGE FROM SMALL-TYPE TURBINE SIDE
• Inspect the following locations for the sound of exhaust gas leakage.
• Is there exhaust gas leakage?
|
Yes
|
Go to Step 9 of the Small-type turbocharger charging deficiency inspection (single-unit inspection).
|
|
No
|
Go to the next step.
|
||
|
4
|
REGULATING VALVE OPENING ANGLE INSPECTION
• Warm up the engine completely.
• Verify PID REGVP and REGVP_DSD using the M-MDS data logger function.
• Idle the engine.
• Is the difference between REGVP and REGVP_DSD 1.0 mm {0.039 in} or more?
|
Yes
|
Inspect the vacuum piping and the regulating solenoid valve.
If normal, replace the turbocharger.
If there is any malfunction, repair or replace the malfunctioning location.
|
|
No
|
Go to the next step.
|
||
|
5
|
REGULATING VALVE OPENING ANGLE INSPECTION
• Display PID REGV using the M-MDS data logger function.
• Idle the engine.
• Is the value for REGV 50% or more?
|
Yes
|
Go to the next step.
|
|
No
|
Perform turbocharger initialization and repeat inspection.
|
||
|
6
|
COMPRESSOR BYPASS VALVE OPENING ANGLE INSPECTION
• Perform the following inspections:
• Is there any malfunction in the inspection results?
|
Yes
|
Replace the turbocharger.
|
|
No
|
Inspect the compressor bypass solenoid valve.
If normal, go to the next step. If there is any malfunction, repair or replace the malfunctioning location.
|
||
|
7
|
INSPECT FOR GAS LEAKAGE FROM COMPRESSOR BYPASS VALVE
• Remove the intake air hose and visually inspect the compressor bypass valve. (If there is foreign matter adhering such as carbon to the seal surface, remove it.)
• Is there deformity or damage?
|
Yes
|
Replace the turbocharger.
|
|
No
|
Go to the next step.
|
||
|
8
|
INSPECTION OF SMALL-TYPE COMPRESSOR WHEEL
• Open the compressor bypass valve and visually inspect the wheel condition from the intake air side.
• Is there deformity or damage?
|
Yes
|
Replace the turbocharger.
|
|
No
|
Go to the next step.
|
||
|
9
|
INSPECTION OF SMALL-TYPE TURBOCHARGER SHAFT AND BEARING
• Open the compressor bypass valve and verify that the rotation is smooth using a long object (long rod) from the intake air side.
• Is the part normal?
|
Yes
|
Go to Step 12 of the Small-type turbocharger charging deficiency inspection (single-unit inspection).
|
|
No
|
Replace the turbocharger.
|
Small-type turbocharger charging deficiency inspection (single-unit inspection)
|
STEP |
INSPECTION |
RESULTS |
ACTION |
|---|---|---|---|
|
10
|
INSPECTION OF EXHAUST GAS LEAKAGE FROM TURBOCHARGER INSTALLATION AREA
• Visually inspect the following parts:
• Is there evidence of exhaust gas leakage on the gasket*, or cracks spreading to the edge of the gasket?
|
Yes
|
If there is evidence of exhaust gas leakage on the gasket, replace the applicable gasket.
If there are cracks on the edge of the gasket or there is exhaust gas leaking from the flanges on both sides of the regulating valve, replace the turbocharger.
|
|
No
|
Go to the next step.
|
||
|
11
|
INSPECT FOR EXHAUST GAS LEAKAGE FROM THE TURBINE HOUSING OR REGULATING VALVE
• Are there cracks penetrating the turbine housing and regulating valve housing?
|
Yes
|
Replace the turbocharger.
|
|
No
|
Go to the next step.
|
||
|
12
|
INSPECTION OF REGULATING VALVE OPENING ANGLE
• Visually inspect the link area of the regulating valve.
• Is there deviation or interference?
|
Yes
|
Replace the turbocharger.
|
|
No
|
The Small-type turbocharger is normal.
|
Oil Leakage Inspection
Oil leakage inspection of compressor side
Possible cause
|
MALFUNCTION OCCURRENCE LOCATION |
PHENOMENON |
CAUSE |
INSPECTION ORDER |
|
|---|---|---|---|---|
|
Regulating valve
|
Large valve opening angle
|
Valve sticking
Rod link deformity
Vacuum malfunction in regulating solenoid valve
|
1
|
|
|
Compressor bypass valve
|
Large valve opening angle
|
Valve sticking
Rod link deformity
Vacuum malfunction in compressor bypass solenoid valve
|
2
|
|
|
Exhaust gas leakage
|
Valve deformity
Foreign matter adhering to seal surface
|
5
|
||
|
Large-type compressor wheel
|
Wheel damage or sticking
|
Foreign matter penetration
Rotation exceeds threshold maximum
|
3
|
|
|
Large-type turbocharger shaft or bearing
|
Sticking or dislodged, broken large-type compressor installation nut
|
Foreign matter penetration
Deficient lubrication
|
4
|
|
|
Small-type compressor wheel
|
Wheel damage or sticking
|
Foreign matter penetration
Rotation exceeds threshold maximum
|
6
|
|
|
Small-type turbocharger shaft or bearing
|
Sticking or dislodged, broken small-type compressor installation nut
|
Foreign matter penetration
Deficient lubrication
|
7
|
|
Oil leakage inspection of compressor side
|
STEP |
INSPECTION |
RESULTS |
ACTION |
|---|---|---|---|
|
1
|
REGULATING VALVE OPENING ANGLE INSPECTION
• Verify PID REGVP and REGVP_DSD using the M-MDS data logger function.
• Idle the engine.
• Is the difference between REGVP and REGVP_DSD 1.0 mm {0.039 in} or more?
|
Yes
|
Replace the turbocharger.
|
|
No
|
Inspect the vacuum pipe.
If it is normal, go to the next step.
If there is any malfunction, repair or replace the malfunctioning part.
|
||
|
2
|
COMPRESSOR BYPASS VALVE OPENING ANGLE INSPECTION
• Perform the following inspections:
• Is there any malfunction in the inspection results?
|
Yes
|
Replace the turbocharger.
|
|
No
|
Go to the next step.
|
||
|
3
|
LARGE-TYPE COMPRESSOR WHEEL INSPECTION
• Remove the intake air hose and, using a mirror, visually inspect the wheel condition from the intake air side.
• Is there deformity or damage?
|
Yes
|
Replace the turbocharger.
|
|
No
|
Go to the next step.
|
||
|
4
|
LARGE-TYPE TURBOCHARGER SHAFT AND BEARING INSPECTION
• Rotate the induction side by hand and inspect for play in the axial direction.
• Does the shaft not rotate smoothly or is there play of 0.5 mm {0.02 in} or more?
|
Yes
|
Replace the turbocharger.
|
|
No
|
Go to the next step.
|
||
|
5
|
INSPECT FOR GAS LEAKAGE FROM COMPRESSOR BYPASS VALVE
• Remove the intake air hose and visually inspect the compressor bypass valve. (If there is foreign matter adhering such as carbon to the seal surface, remove it.)
• Is there deformity or damage?
|
Yes
|
Replace the turbocharger.
|
|
No
|
Go to the next step.
|
||
|
6
|
INSPECTION OF SMALL-TYPE COMPRESSOR WHEEL
• Open the compressor bypass valve and visually inspect the wheel condition from the intake air side.
• Is there deformity or damage?
|
Yes
|
Replace the turbocharger.
|
|
No
|
Go to the next step.
|
||
|
7
|
INSPECTION OF SMALL-TYPE TURBOCHARGER SHAFT AND BEARING
• Open the compressor bypass valve and verify that the rotation is smooth using a long object (long rod) from the intake air side.
• Is the part normal?
|
Yes
|
The turbocharger is normal.
|
|
No
|
Replace the turbocharger.
|
Oil leakage inspection on turbine side
Possible cause
|
MALFUNCTION OCCURRENCE LOCATION |
PHENOMENON |
CAUSE |
INSPECTION ORDER |
|
|---|---|---|---|---|
|
Regulating valve
|
Large valve opening angle
|
Valve sticking
Rod link deformity
Vacuum malfunction in regulating solenoid valve
|
1
|
|
|
Wastegate valve
|
Large valve opening angle
|
Valve sticking
Rod link deformity
Vacuum malfunction in wastegate solenoid valve
|
2
|
|
|
Exhaust gas leakage
|
Valve deformity
Foreign matter adhering to seal surface
|
6
|
||
|
Large-type turbocharger shaft or bearing
|
Sticking or dislodged, broken large-type compressor installation nut
|
Foreign matter penetration
Deficient lubrication
|
3
|
|
|
Small-type turbocharger shaft or bearing
|
Sticking or dislodged, broken small-type compressor installation nut
|
Foreign matter penetration
Deficient lubrication
|
4
|
|
|
Large-type turbine wheel
|
Wheel damage or sticking
|
Foreign matter penetration
Rotation exceeds threshold maximum
|
5
|
|
Oil leakage inspection on turbine side
|
STEP |
INSPECTION |
RESULTS |
ACTION |
|||
|---|---|---|---|---|---|---|
|
1
|
REGULATING VALVE OPENING ANGLE INSPECTION
• Verify PID REGVP and REGVP_DSD using the M-MDS data logger function.
• Is the difference less than 1.0 mm {0.039 in}?
|
Yes
|
Replace the turbocharger.
|
|||
|
No
|
Inspect the vacuum pipe.
If it is normal, go to the next step.
If there is any malfunction, repair or replace the malfunctioning part.
|
|||||
|
2
|
WASTEGATE VALVE OPENING ANGLE INSPECTION
• Perform the following inspections:
• Is there any malfunction in the inspection results?
|
Yes
|
Replace the turbocharger.
|
|||
|
No
|
Go to the next step.
|
|||||
|
3
|
LARGE-TYPE TURBOCHARGER SHAFT AND BEARING INSPECTION
• Rotate the induction side by hand and inspect for play in the axial direction.
• Does the shaft not rotate smoothly or is there play of 0.5 mm {0.02 in} or more?
|
Yes
|
Replace the turbocharger.
|
|||
|
No
|
Go to the next step.
|
|||||
|
4
|
INSPECTION OF SMALL-TYPE TURBOCHARGER SHAFT AND BEARING
• Open the compressor bypass valve and verify that the rotation is smooth using a long object (long rod) from the intake air side.
• Is the part normal?
|
Yes
|
Next step the Small-type turbocharger charging deficiency inspection (single-unit inspection).
|
|||
|
No
|
Replace the turbocharger.
|
|||||
|
5
|
LARGE-TYPE TURBINE WHEEL INSPECTION
• Remove the catalytic converter and visually inspect the wheel condition from the exhaust gas side.
• Is there deformity or damage?
|
Yes
|
Replace the turbocharger.
|
|||
|
No
|
Go to the next step.
|
|||||
|
6
|
INSPECTION OF GAS LEAKAGE FROM WASTEGATE VALVE
• Remove the catalytic converter and visually inspect the valve from the exhaust gas side. (If there is foreign matter adhering such as carbon to the seal surface, remove it.)
• Is there deformity or damage?
|
Yes
|
Replace the turbocharger.
|
|||
|
No
|
The turbocharger is normal.
|
Abnormal Noise Inspection
Possible cause
|
MALFUNCTION OCCURRENCE LOCATION |
PHENOMENON |
CAUSE |
INSPECTION ORDER |
|
|---|---|---|---|---|
|
Large-type compressor wheel
|
Wheel damage or sticking
|
Foreign matter penetration
Rotation exceeds threshold maximum
|
1
|
|
|
Large-type turbocharger shaft or bearing
|
Sticking or dislodged, broken large-type compressor installation nut
|
Foreign matter penetration
Deficient lubrication
|
2
|
|
|
Small-type compressor wheel
|
Wheel damage or sticking
|
Foreign matter penetration
Rotation exceeds threshold maximum
|
3
|
|
|
Small-type turbocharger shaft or bearing
|
Sticking or dislodged, broken small-type compressor installation nut
|
Foreign matter penetration
Deficient lubrication
|
4
|
|
|
Large-type turbine wheel
|
Wheel damage or sticking
|
Foreign matter penetration
Rotation exceeds threshold maximum
|
5
|
|
Abnormal noise inspection
|
STEP |
INSPECTION |
RESULTS |
ACTION |
|---|---|---|---|
|
1
|
LARGE-TYPE COMPRESSOR WHEEL INSPECTION
• Remove the intake air hose and, using a mirror, visually inspect the wheel condition from the intake air side.
• Is there deformity or damage?
|
Yes
|
Replace the turbocharger.
|
|
No
|
Go to the next step.
|
||
|
2
|
LARGE-TYPE TURBOCHARGER SHAFT AND BEARING INSPECTION
• Rotate the induction side by hand and inspect for play in the axial direction.
• Does the shaft not rotate smoothly or is there play of 0.5 mm {0.02 in} or more?
|
Yes
|
Replace the turbocharger.
|
|
No
|
Go to the next step.
|
||
|
3
|
INSPECTION OF SMALL-TYPE COMPRESSOR WHEEL
• Open the compressor bypass valve and visually inspect the wheel condition from the intake air side.
• Is there deformity or damage?
|
Yes
|
Replace the turbocharger.
|
|
No
|
Go to the next step.
|
||
|
4
|
INSPECTION OF SMALL-TYPE TURBOCHARGER SHAFT AND BEARING
• Open the compressor bypass valve and verify that the rotation is smooth using a long object (long rod) from the intake air side.
• Is the part normal?
|
Yes
|
Go to next step of the Small-type turbocharger charging deficiency inspection (single-unit inspection).
|
|
No
|
Replace the turbocharger.
|
||
|
5
|
LARGE-TYPE TURBINE WHEEL INSPECTION
• Remove the catalytic converter and visually inspect the wheel condition from the exhaust gas side.
• Is there deformity or damage?
|
Yes
|
Replace the turbocharger.
|
|
No
|
The turbocharger is normal.
|