 |
OIL COOLER REMOVAL/INSTALLATION [SKYACTIV-D 1.5]
id0111q2800800
1. Disconnect the negative battery cable. (See NEGATIVE BATTERY CABLE DISCONNECTION/CONNECTION [SKYACTIV-D 1.5].)
2. Remove the engine cover. (See ENGINE COVER REMOVAL/INSTALLATION [SKYACTIV-D 1.5].)
3. Remove the front under cover No.2. (See FRONT UNDER COVER No.2 REMOVAL/INSTALLATION.)
4. Drain the engine coolant and the water-cooled charge air cooler coolant. (See ENGINE COOLANT REPLACEMENT [SKYACTIV-D 1.5].) (See WATER-COOLED CHARGE AIR COOLER COOLANT REPLACEMENT [SKYACTIV-D 1.5].)
5. Remove the intake manifold component. (See INTAKE-AIR SYSTEM REMOVAL/INSTALLATION [SKYACTIV-D 1.5].)
6. Remove the starter. (ATX) (See STARTER REMOVAL/INSTALLATION [SKYACTIV-D 1.5].)
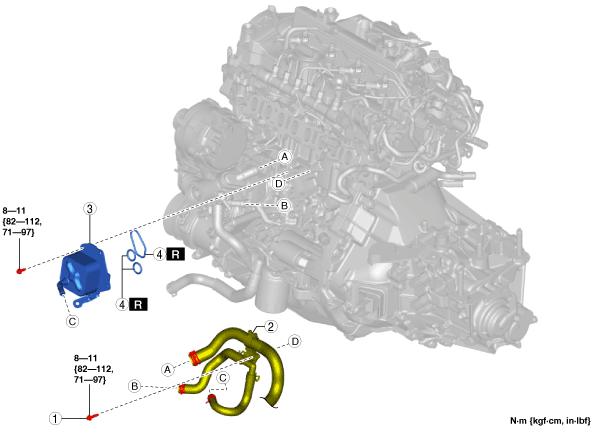
7. Remove in the order indicated in the table.
8. Wipe engine oil or coolant off completely from the following parts.
9. Install in the reverse order of removal.
10. Refill the engine coolant and water-cooled charge air cooler coolant. (See ENGINE COOLANT REPLACEMENT [SKYACTIV-D 1.5].) (See WATER-COOLED CHARGE AIR COOLER COOLANT REPLACEMENT [SKYACTIV-D 1.5].)
11. Start the engine and confirm that there is no oil leakage.
12. Inspect the oil level. (See ENGINE OIL LEVEL INSPECTION [SKYACTIV-D 1.5].)
13. Inspect for engine coolant leakage and water-cooled charge air cooler coolant leakage. (See ENGINE COOLANT LEAKAGE INSPECTION [SKYACTIV-D 1.5].) (See WATER-COOLED CHARGE AIR COOLER COOLANT LEAKAGE INSPECTION [SKYACTIV-D 1.5].)
MTX
ac3wzw00001852
|
ATX
ac3wzw00001851
|
|
1
|
Water pipe installation bolts
|
|
2
|
Water hose and pipe component
|
|
3
|
Oil cooler
(See Oil Cooler Removal Note.)
(See Oil Cooler Installation Note.)
|
|
4
|
O-ring
(See O-ring Installation Note.)
|
Water Hose and Pipe Component Removal Note
1. Before disconnecting the hose, place an appropriate container under the engine to collect the engine coolant.
2. Disconnect the three water hoses (one on oil cooler part and two on coolant control valve part).
3. Set the water hose and pipe component aside so that it does not interfere with the servicing.
Oil Cooler Removal Note
1. Detach the clips shown in the figure and set the wiring harness aside.
ac3wzw00001853
|
2. Cover the area around the oil cooler with a rag because engine oil and engine coolant leak from the oil cooler installation area.
3. Remove the oil cooler.
O-ring Installation Note
1. Install new O-rings to the oil cooler.
am2zzw00011205
|
Oil Cooler Installation Note
1. Tighten the bolts in the order shown in the figure.
ac3wzw00001854
|