 |
am2zzw00007434
VACUUM PUMP REMOVAL/INSTALLATION [SKYACTIV-D 1.5]
id0411008036t9
1. Remove the engine cover. (See ENGINE COVER REMOVAL/INSTALLATION [SKYACTIV-D 1.5].)
2. Remove the battery. (See BATTERY REMOVAL/INSTALLATION [SKYACTIV-D 1.5].)
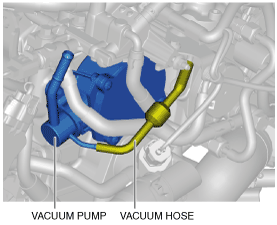
3. Pinch open the clamp using pliers and disconnect the vacuum hose from the vacuum pump. (See VACUUM HOSE REMOVAL/INSTALLATION.)
4. Remove the following parts as a single unit. (See INTAKE-AIR SYSTEM REMOVAL/INSTALLATION [SKYACTIV-D 1.5].)
5. Remove the vacuum pipe installation bolts. (See FUEL INJECTOR REMOVAL/INSTALLATION [SKYACTIV-D 1.5].)
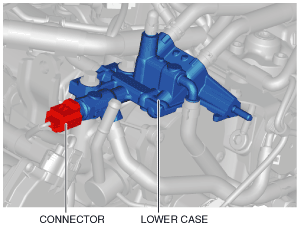
6. Disconnect the engine coolant temperature (ECT) sensor connector.
am2zzw00007434
|
7. Remove the vacuum hose.
am2zzw00007435
|
8. Disconnect the fuel temperature sensor connector.
am2zzw00007436
|
9. Perform the “BEFORE SERVICE PRECAUTION”. (See BEFORE SERVICE PRECAUTION [SKYACTIV-D 1.5].)
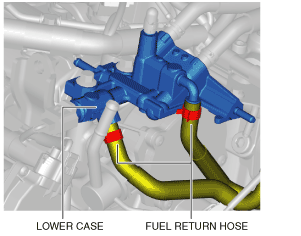
10. Disconnect the fuel return hoses from the lower case. (See LOWER CASE REMOVAL/INSTALLATION [SKYACTIV-D 1.5].)
am2zzw00007437
|
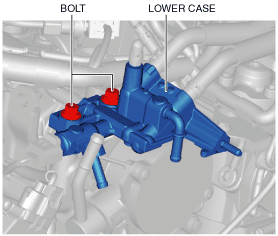
11. Remove the lower case installation bolts. (See LOWER CASE REMOVAL/INSTALLATION [SKYACTIV-D 1.5].)
am2zzw00007438
|
12. Remove in the order shown in the table.
13. Install in the reverse order of removal.
14. Perform the “AFTER SERVICE PRECAUTION”. (See AFTER SERVICE PRECAUTION [SKYACTIV-D 1.5].)
adejjw00010170
|
|
1
|
Bolt
|
|
2
|
Vacuum pump
(See Vacuum Pump Removal Note.)
|
|
3
|
O-ring
|
Vacuum Pump Removal Note
1. When removing the vacuum pump, place a rag under the installation surface of the vacuum pump so that engine oil does not get on other parts.
2. Remove the vacuum pump.
Vacuum Pump and O-ring Installation Note
1. Rotate the vacuum pump by hand to drain the remainder of the engine oil in the vacuum pump.
2. Degrease the O-ring installation groove and installation surface.
3. Install the new O-ring to the vacuum pump.
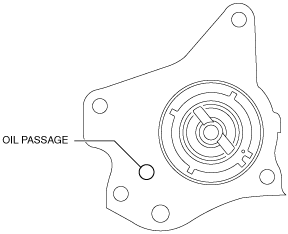
4. Insert a cloth into the oil passage shown in the figure.
am3zzw00017996
|
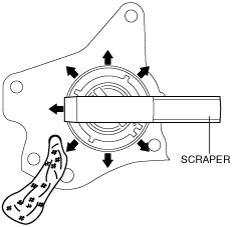
5. Scrape the cylinder head from the inside to the outside using a scraper and clean away the remaining silicone sealant on the cylinder head so that it does not get in the cylinder head.
am3zzw00017997
|
6. Clean the cylinder head.
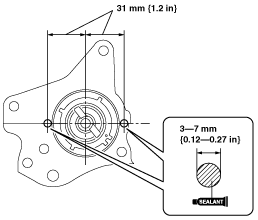
7. Apply silicone sealant (TB1217D) to the positions shown in the figure.
adejjw00010171
|
8. Install the vacuum pump.