 |
am3uuw00010234
CLIMATE CONTROL UNIT REMOVAL/INSTALLATION [MANUAL AIR CONDITIONER]
id0740a2807400
L.H.D.
1. Disconnect the negative battery cable. (See NEGATIVE BATTERY CABLE DISCONNECTION/CONNECTION [MZR 1.6].)(See NEGATIVE BATTERY CABLE DISCONNECTION/CONNECTION [SKYACTIV-G 1.5, SKYACTIV-G 2.0, SKYACTIV-G 2.5].)(See NEGATIVE BATTERY CABLE DISCONNECTION/CONNECTION [SKYACTIV-D 1.5].)(See NEGATIVE BATTERY CABLE DISCONNECTION/CONNECTION [SKYACTIV-D 2.2].)
2. Remove the following parts:
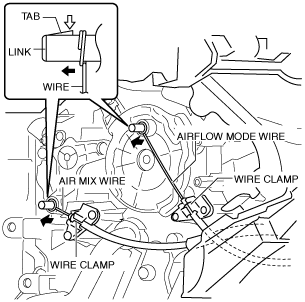
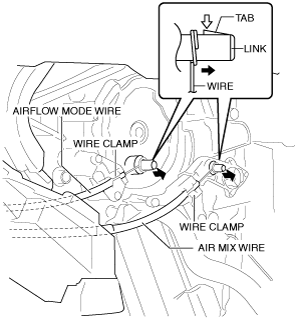
3. Press the tab down, then slide the wire off the link.
am3uuw00010234
|
4. Remove the wire from the wire clamp.
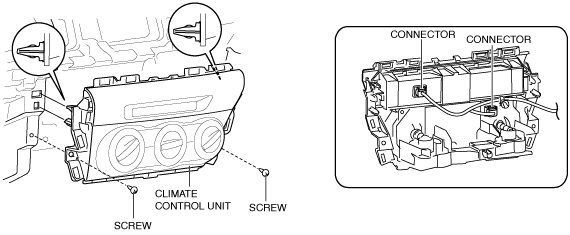
5. Remove the screws.
am3zzw00015154
|
6. Remove the climate control unit. (See Climate control unit removal note.)
7. Disconnect the connector.
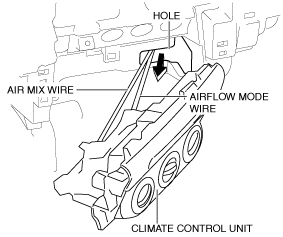
8. Pull out the air mix wire and airflow mode wire from the hole.
am3uuw00010236
|
9. Install in the reverse order of removal.
10. Verify that the dial operation is correct by fully turning each of the dials from one end to the other.
Climate control unit removal note
1. The indicator unit can be removed from the climate control unit. Refer to the INDICATOR UNIT REMOVAL/INSTALLATION for the detailed procedure. (See INDICATOR UNIT REMOVAL/INSTALLATION.)
R.H.D.
1. Disconnect the negative battery cable. (See NEGATIVE BATTERY CABLE DISCONNECTION/CONNECTION [MZR 1.6].)(See NEGATIVE BATTERY CABLE DISCONNECTION/CONNECTION [SKYACTIV-G 1.5, SKYACTIV-G 2.0, SKYACTIV-G 2.5].)(See NEGATIVE BATTERY CABLE DISCONNECTION/CONNECTION [SKYACTIV-D 1.5].)(See NEGATIVE BATTERY CABLE DISCONNECTION/CONNECTION [SKYACTIV-D 2.2].)
2. Remove the following parts:
3. Press the tab down, then slide the wire off the link.
am3zzw00015155
|
4. Remove the wire from the wire clamp.
5. Remove the screws.
am3zzw00015154
|
6. Remove the climate control unit. (See Climate control unit removal note.)
7. Disconnect the connector.
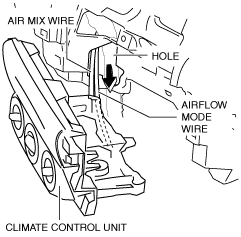
8. Pull out the air mix wire and airflow mode wire from the hole.
am3zzw00015156
|
9. Install in the reverse order of removal.
10. Verify that the dial operation is correct by fully turning each of the dials from one end to the other.
Climate control unit removal note
1. The indicator unit can be removed from the climate control unit. Refer to the INDICATOR UNIT REMOVAL/INSTALLATION for the detailed procedure. (See INDICATOR UNIT REMOVAL/INSTALLATION.)