DASHBOARD REMOVAL
id091700850000
1. Set the wheel blocks for both the front and rear wheels.
2. Disconnect the negative battery cable. (See NEGATIVE BATTERY CABLE DISCONNECTION/CONNECTION [MZR 1.6].) (See NEGATIVE BATTERY CABLE DISCONNECTION/CONNECTION [SKYACTIV-G 1.5, SKYACTIV-G 2.0, SKYACTIV-G 2.5].) (See NEGATIVE BATTERY CABLE DISCONNECTION/CONNECTION [SKYACTIV-D 2.2].)(See NEGATIVE BATTERY CABLE DISCONNECTION/CONNECTION [SKYACTIV-D 1.5].)
3. Shift the selector lever from the P position to the D position (ATX).
4. Remove the following parts:
- (1) Windshield wiper arm and blade (See WINDSHIELD WIPER ARM AND BLADE REMOVAL/INSTALLATION.)
-
- (2) Cowl grille (See COWL GRILLE REMOVAL/INSTALLATION.)
-
- (3) Front scuff plate (See FRONT SCUFF PLATE REMOVAL/INSTALLATION.)
-
- (4) Front side trim (See FRONT SIDE TRIM REMOVAL/INSTALLATION.)
-
- (5) A-pillar trim (See A-PILLAR TRIM REMOVAL/INSTALLATION.)
-
- (6) Driver-side air bag module (See DRIVER-SIDE AIR BAG MODULE REMOVAL.) (See DRIVER-SIDE AIR BAG MODULE INSTALLATION.)
-
- (7) Steering wheel (See STEERING WHEEL AND COLUMN REMOVAL/INSTALLATION.)
-
- (8) Upper column cover (See COLUMN COVER REMOVAL/INSTALLATION.)
-
- (9) Meter hood (See METER HOOD REMOVAL/INSTALLATION.)
-
- (10) Lower column cover (See COLUMN COVER REMOVAL/INSTALLATION.)
-
- (11) Instrument cluster (See INSTRUMENT CLUSTER REMOVAL/INSTALLATION.)
-
- (12) Upper panel (See UPPER PANEL REMOVAL.) (See UPPER PANEL INSTALLATION.)
-
- (13) Rear console (See REAR CONSOLE REMOVAL/INSTALLATION.)
-
- (14) Shift lever knob (MTX) (See MANUAL TRANSAXLE SHIFT MECHANISM REMOVAL/INSTALLATION [F35M-R].) (See MANUAL TRANSAXLE SHIFT MECHANISM REMOVAL/INSTALLATION [C66M-R].) (See MANUAL TRANSAXLE SHIFT MECHANISM REMOVAL/INSTALLATION [D66M-R].) (See MANUAL TRANSAXLE SHIFT MECHANISM REMOVAL/INSTALLATION [F66M-R].)
-
- (15) Selector lever knob (ATX) (See AUTOMATIC TRANSAXLE SHIFT MECHANISM REMOVAL/INSTALLATION.)
-
- (16) Shift panel (See SHIFT PANEL REMOVAL/INSTALLATION.)
-
- (17) Front console box (See FRONT CONSOLE BOX REMOVAL/INSTALLATION.)
-
- (18) CD player (with CD player) (See CD PLAYER REMOVAL.)
-
- (19) DVD/CD player (with DVD/CD player) (See DVD/CD PLAYER REMOVAL.)
-
- (20) Side wall (See SIDE WALL REMOVAL/INSTALLATION.)
-
- (21) Glove compartment (See GLOVE COMPARTMENT REMOVAL/INSTALLATION.)
-
- (22) Dashboard under cover (See DASHBOARD UNDER COVER REMOVAL/INSTALLATION.)
-
- (23) Decoration panel (See DECORATION PANEL REMOVAL/INSTALLATION.)
-
- (24) Passenger-side lower panel (See LOWER PANEL REMOVAL/INSTALLATION.)
-
- (25) Front console (See FRONT CONSOLE REMOVAL/INSTALLATION.)
-
- (26) Climate control unit (See CLIMATE CONTROL UNIT REMOVAL/INSTALLATION [FULL-AUTO AIR CONDITIONER].) (See CLIMATE CONTROL UNIT REMOVAL/INSTALLATION [MANUAL AIR CONDITIONER].)
-
- (27) Center display (with center display) (See CENTER DISPLAY REMOVAL/INSTALLATION.)
-
- (28) Audio unit (without center display) (See AUDIO UNIT REMOVAL/INSTALLATION.)
-
- (29) Bonnet release lever (See BONNET RELEASE LEVER AND RELEASE CABLE REMOVAL/INSTALLATION.)
-
- (30) Fuel-filler lid opener lever (See FUEL-FILLER LID OPENER AND LEVER REMOVAL/INSTALLATION.)
-
- (31) Driver-side lower panel (See LOWER PANEL REMOVAL/INSTALLATION.)
-
- (32) Joint cover (See STEERING WHEEL AND COLUMN REMOVAL/INSTALLATION.)
-
- (33) Steering shaft (See STEERING WHEEL AND COLUMN REMOVAL/INSTALLATION.)
-
- (34) Shift lever component (MTX) (See MANUAL TRANSAXLE SHIFT MECHANISM REMOVAL/INSTALLATION [F35M-R].) (See MANUAL TRANSAXLE SHIFT MECHANISM REMOVAL/INSTALLATION [C66M-R].) (See MANUAL TRANSAXLE SHIFT MECHANISM REMOVAL/INSTALLATION [D66M-R].) (See MANUAL TRANSAXLE SHIFT MECHANISM REMOVAL/INSTALLATION [F66M-R].)
-
- (35) Selector lever component (ATX) (See AUTOMATIC TRANSAXLE SHIFT MECHANISM REMOVAL/INSTALLATION.)
-
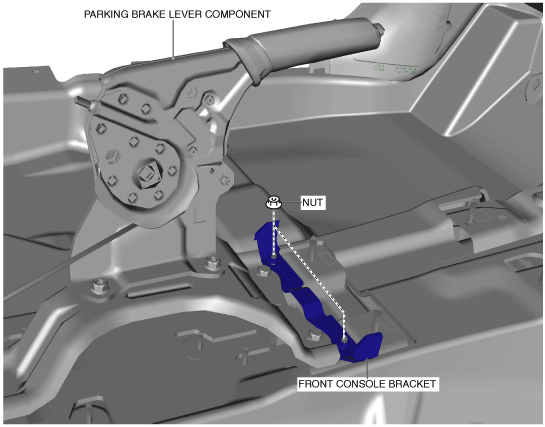
5. Remove nuts.
6. Remove the front console bracket.
7. Remove bolts.
8. Remove the parking brake lever component.
9. Disconnect the dashboard harness connectors and remove the wiring harness clip.
10. Remove the bolts and nuts shown in the figure.
11. Remove the dashboard bracket.
12. To prevent scratches or damage, affix protective tape to the position shown in the figure of the windshield.
13. Remove bolts.
14. Remove the caps, then remove bolts.
15. Move the dashboard in the direction of the arrow in the order of (1), (2) shown in the figure, then remove the guide pin.
16. Turn the dashboard 90° in the direction of the arrow (3) shown in the figure.
17. Take the dashboard off from the front driver-side door or front passenger-side door opening.
